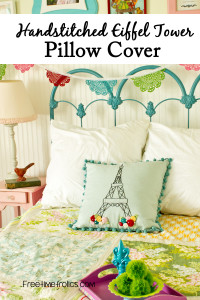
The Eiffel Tower has always been a favorite of mine. So when my daughter became obsessed with it I decided to indulge her a bit. I thought a pillow for her bed would be cute. I looked for one I loved but didn’t find one in my budget. I decide to just make one with supplies I had at my home. The pattern is simple to stitch and only requires some fabric, thread and a little sewing ability.
Simple No-Slip Rug Cover
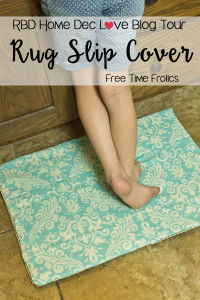
For today’s project I decided to get rid of my ugly rug and turn it into something amazing. I didn’t want to have to buy a new rug so I made a simple slip cover to make it match my style. I tried this once before with my large rug. The great think about this one is it is fast and easy to make with a small rug. It has an open bottom for easy removal and washing. I started by finding these amazing fabrics at Riley Blake Designs.
Reusable Sandwich Bags & The Ribbon Retreat
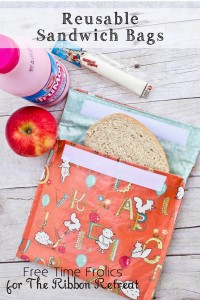
I am over at the Ribbon Retreat today sharing in there Back to School A-Z series! Come on over and check out my post!

How to cover a pillow with a Dishtowel DIY
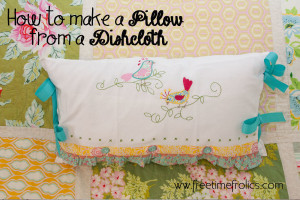
I love finding simple everyday things and turning them into something amazing. Today I am going to share how to make a pillow cover with a Dishtowel. This project was super easy ,cheap inexpensive and makes an adorable throw pillow for a bed or chair. Making the pillow took me about 30 minutes, with minimal sewing. Not to mention it cost me less than $5.

Let’s get started. First I found this dishtowel at TJ Maxx for $4. I fell on love with the little appliqued birds and ruffle. I knew immediately this little beauty was going to be a pillow for my daughters bed. The colors match her room perfect. My towel measured 20×30.

Next I picked out 3 buttons and 2 1/2 yards of ribbon to match. I had a pillow for from a previous couch pillow I didn’t need anymore. If you are looking for a pillow form, Home Fabrics and Rugs is a great place to get them.
Next I wrapped my dishtowel around my pillow form to get a general idea of how far the dishtowel would wrap. Mine wrapped around once with a a 5 inch overlap. With that in mind, I folded the bottom edge of my dishtowel about 8 inches. I pinned the edges into place.
Next cut you ribbon into 8 equal pieces. Burn the edges with a match. This will keep the ends from unraveling. Pin your ribbon into position. I pinned mine at the top of the folded edge and 3 1/2 inches from the bottom folded edge, in between the 2 pieces of fabric..

Stitch into place. Making a pocket for the pillow.
Place your pillow in the sewn pocket. I did this to check for placement of the other ribbons. My ribbons were placed 3 and 7 inches from the top of the ruffle. Just make sure they sit directly even with each other. Stitch them into place.
For the last step I placed my buttons. I measured for center and pinned. For the other buttons I measured from the middle to each end and found that center and pinned on both sides. This is where I made my button holes.

Hand stitch your buttons on and you are all done!! Now you have an adorable decorative throw pillow for a bed or chair for spring or a little girls bedroom. My little girl loves her new decorative pillow on her bed. I need to keep my eyes open for a few more just like them.

Let’s talk toilet paper holder covers…
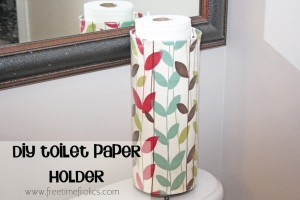
Let’s talk toilet paper…So tell me if this is you. You go to the bathroom for a self imposed time out. You should have been put in time out and hour ago, but alas the kids wouldn’t allow it. You finally get your time out and you realize part way through you are out of toilet paper. Sound familiar??? Then you have to all to one of your kids…to interrupt you time out to bring you some toilet paper. Well your quiet time out is over..
This is a weekly problem at my house. My Master Bath is about the only place I get a little quiet during the day. Maybe 5 minutes a few times a day.
So one day I was perusing my local Ross and found this… A toilet paper holder tower.

An answer to my problem. But it created a new problem. Every once in a while a boy uses my Master Bath. And sometime their aim isn’t so great. Can you see my problem?? I kind of have issues. Its like not lifting the toilet seat or not putting it down. Just plain gross. ( I have a printable for that issue click here)
So I came up with this quick and easy project to remedy the problem.

Toilet Paper Tower Cover
First you need to pick up a few things:
Toilet paper holder ( I got mine at Ross for under $10)
Decorator fabric to match you bathroom.
Iron on laminate for fabrics I found mine at Walmart
Measure you circumference of your Toilet paper holder and add 1 inch.Measure from top to bottom and add 2 inches.

Cut according to size.
If you are using laminate cover fabric move to the next step. If you are making your own follow the instructions that come with your laminate.

Stitch down your long seam. Ensure it fits around your holder before moving to the next step. Also you don’t want it to tights. It may stretch you fabric and tear the laminate.
Fold over top seam 1/2 inch then another 1/2 inch. Stitch into place. Repeat for the bottom.
Before After

Slide it over the top and your finished.

Rug Slip Cover Makeover
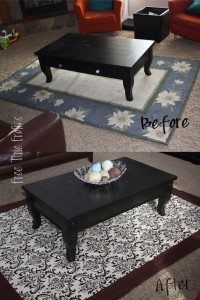
Since moving into our new home I have been slacking when it comes to decorating. Pregnancy and a new baby really take its toll. But finally I am feeling good enough to do something.
I finally got the “get my house decorated bug.”
I have this new, larger home than the last. Which means money. I have limited funds to fancy up my casa. But I am determined to do this on a budget.
From our old home I have this rug. It is still in fair condition. But the style is not mine anymore. I have been looking for the right rug. But I just haven’t found what I want. Or can not afford what I want. Then I had an idea.
Just did a little DIY rug recovering.
My thought was to make it like a duvet cover. It just slips on and off.
So I searched through fabric I already had. (I buy fabric on a whim if I love it. It is a terrible habit. I have quite the collection of fabrics in my craftroom.) And found one I thought would work.


So here are the before and afters.

See that adorable blue and green with sun flowers.
It needs a little pick me up.
And here is the after.

Here is the new fabric. Natural Cotton with a Chocolate Damask. I love this print. I bought a few yards a year or two ago at Home Fabrics and Rugs. I have been saving it for a special occasion. One just like this.

I added an outside border so I didn’t have to piece any fabric. I think it turned out great. It makes a nice addition to my living room.

I used about 2 yards of damask fabric and 3 yards of brown. I had some brown leftover for another project.
So here is how I did it.
My rug is 5×7. My damask fabric is 54 wide. I needed 12 more inches to make it wide enough. So I added the brown. I measured my length minus 12 inches.
So my inside damask and backing fabric measured 54 x 78.
My rug is 5×7. My damask fabric is 54 wide. I needed 12 more inches to make it wide enough. So I added the brown. I measured my length minus 12 inches.
So my inside damask and backing fabric measured 54 x 78.
My border fabric was cut 3 yards x 13 inches. One piece was slightly wider. I used these piece for the top. So I would have a little extra for the folded flap.
I sewed the side borders on first. Then the bottom and top.
Next pin the backing onto the top. Right sides together.
Fold the border in half and pin the sides to the backing fabric.Stitch your side seams.
Leave our corners for the next step.

I made my corners with a mitered edge.

Stitch your seam to make your corners. Trim off the extra fabric.
For the top I folded the top down so the top border is 6 inches.This makes the fabric become like a fold over sandwich bag.
Next I marked the backing fabric to make button holes. I made the button holes and hand sewed the buttons.
Slide your rug in and your done.

Your very own DIY Rug Makeover.
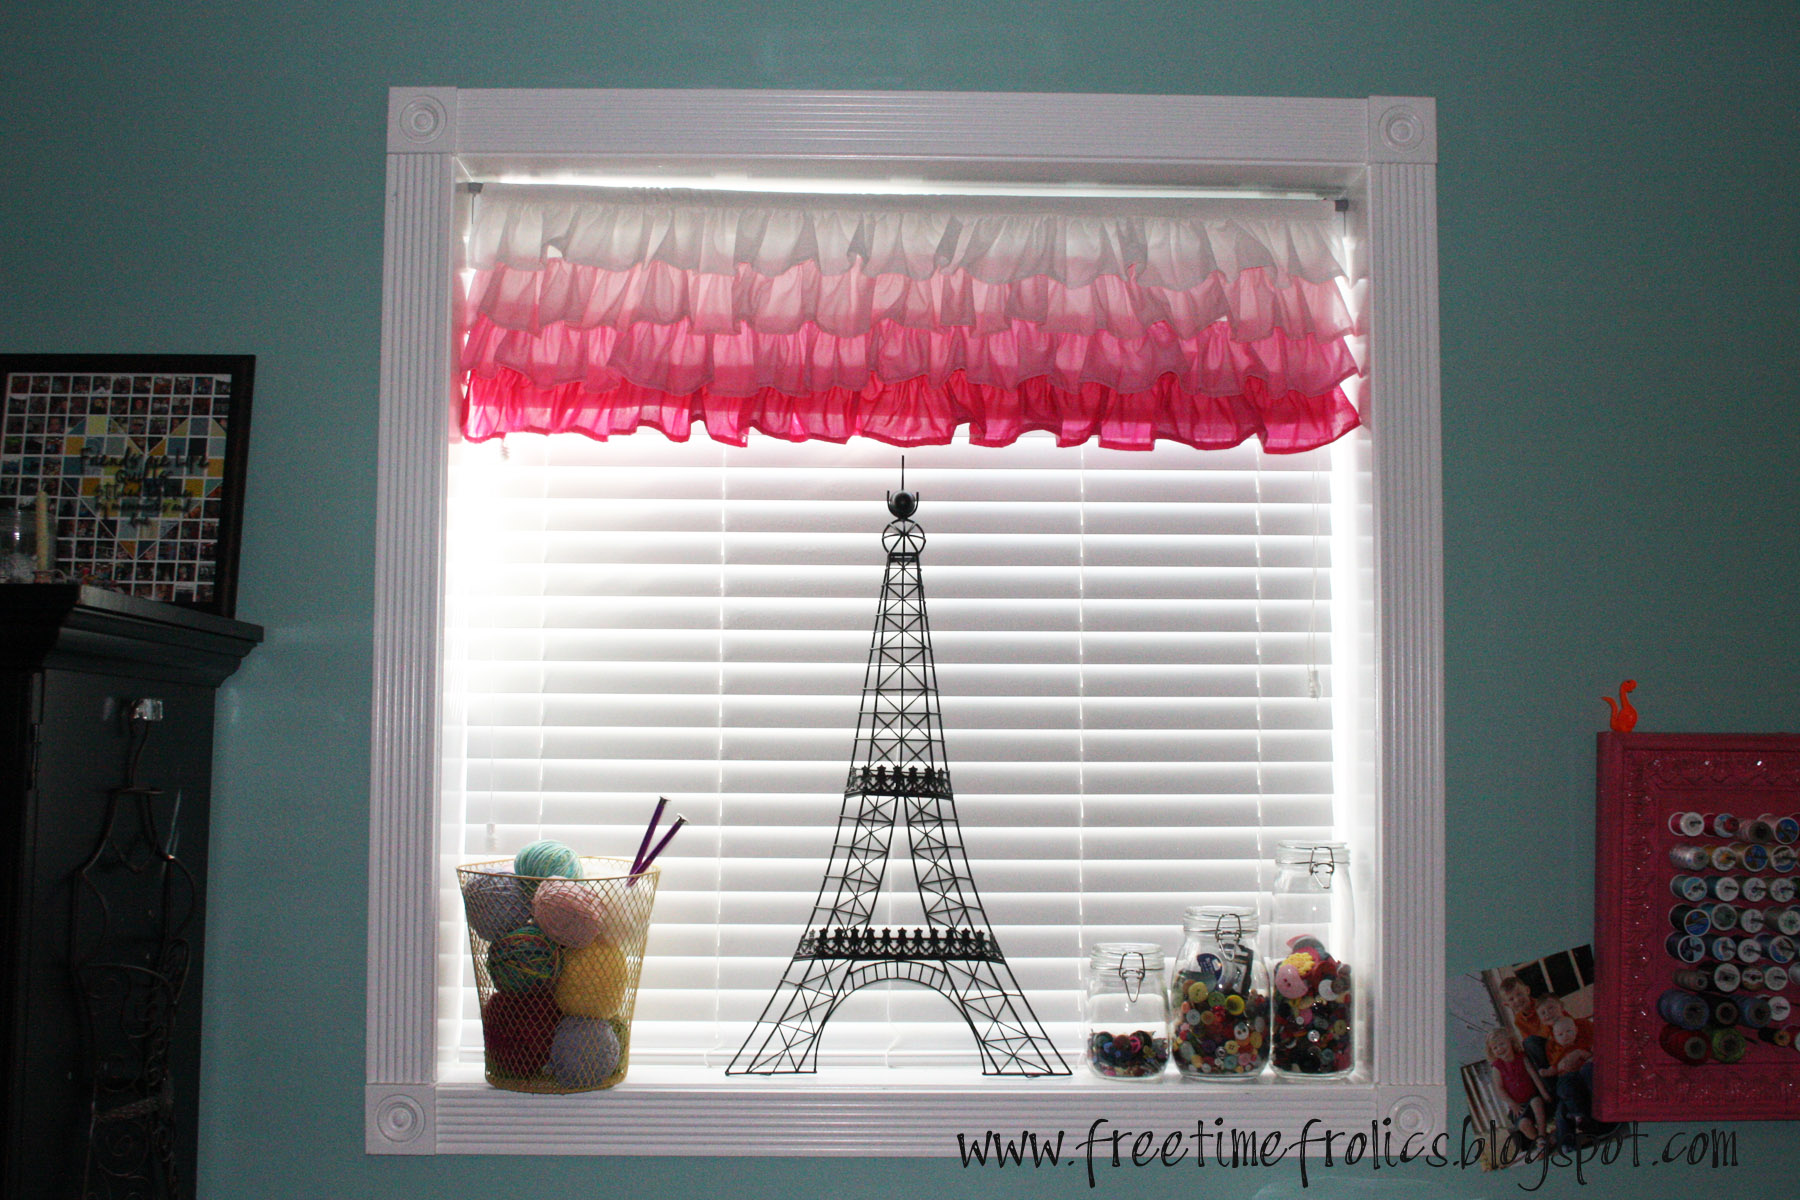
Ombre Curtain
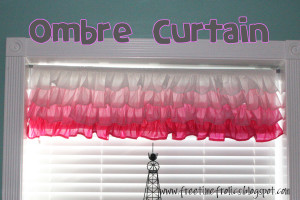
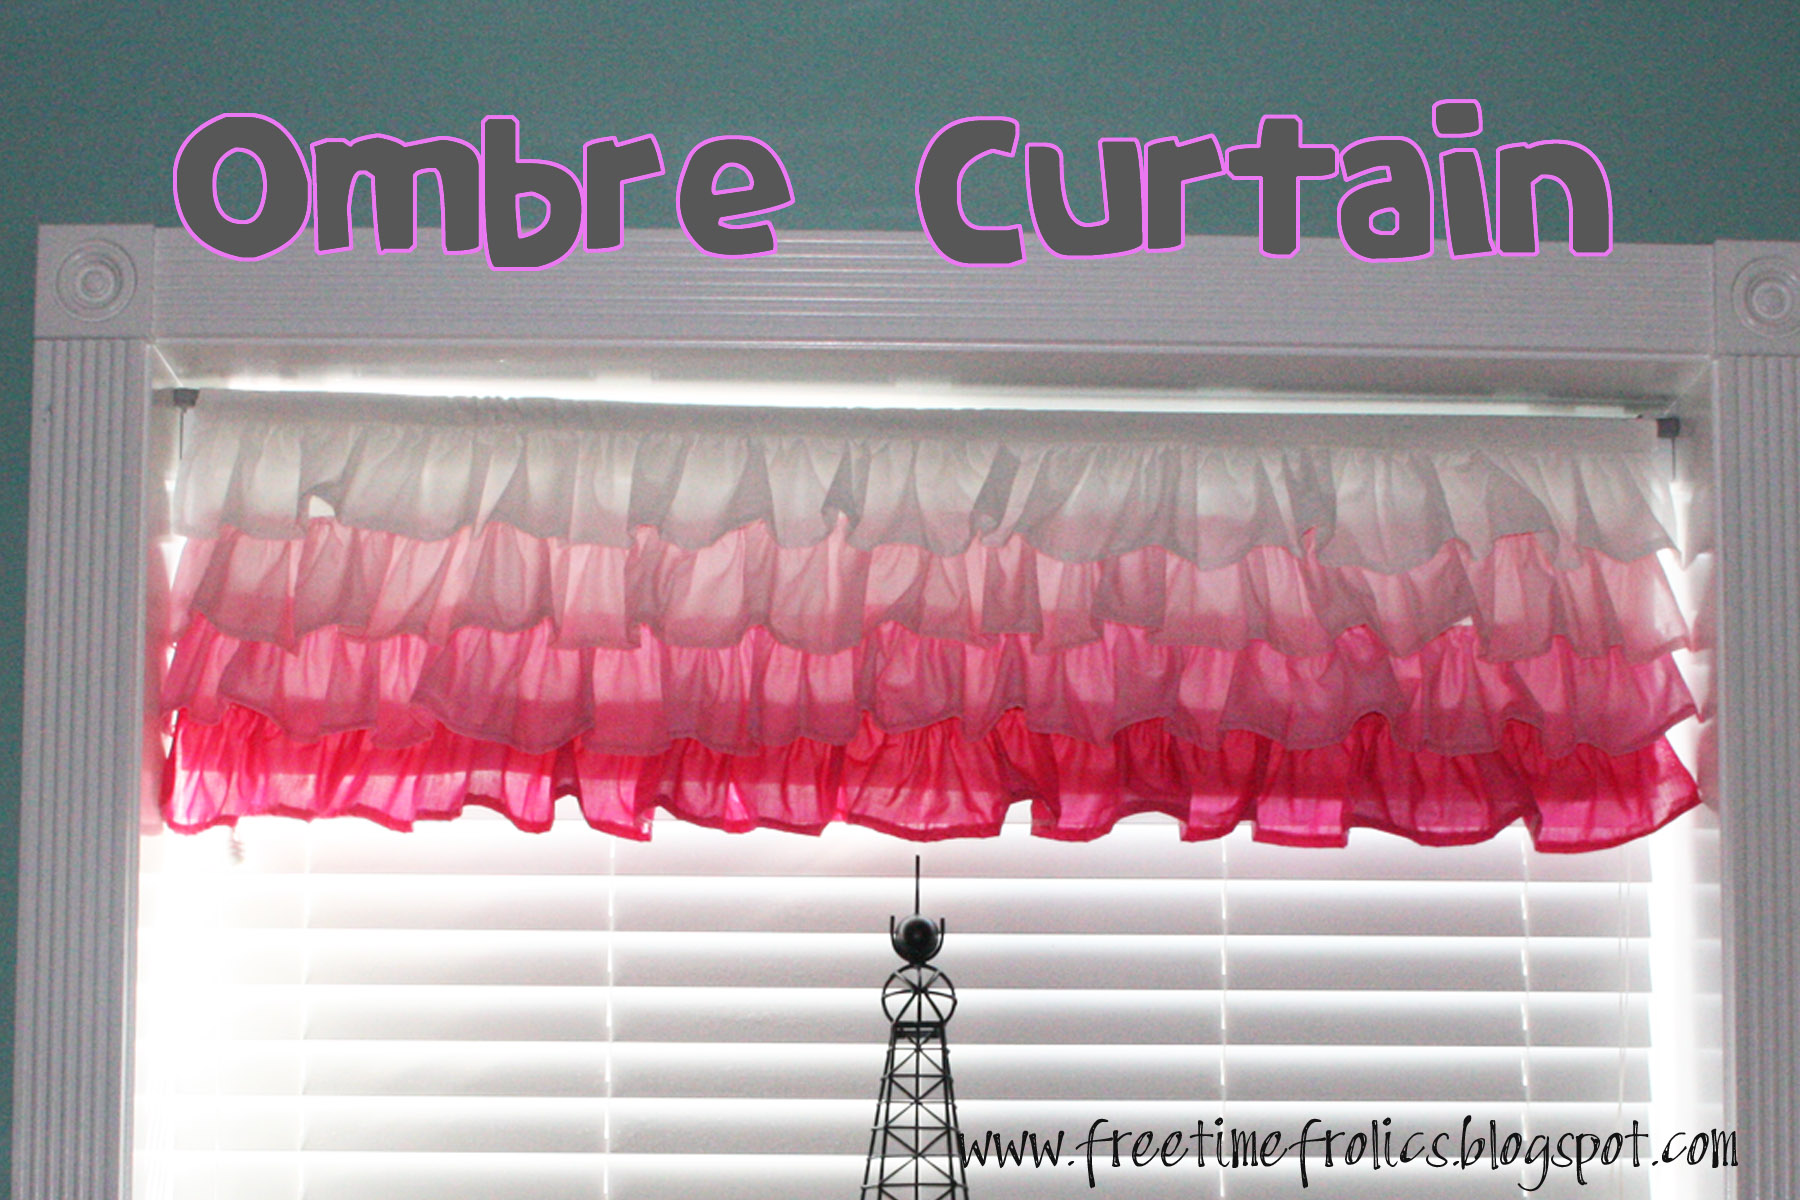
As part of my Crap room to Craft room Redo I needed a window treatment.
I wanted something that let the light in but covered the blinds when they are raised.
A short valance it is!
To add a littel flair, I went Ombre Style.
White to Pink. Perfect for my turquoise walls.
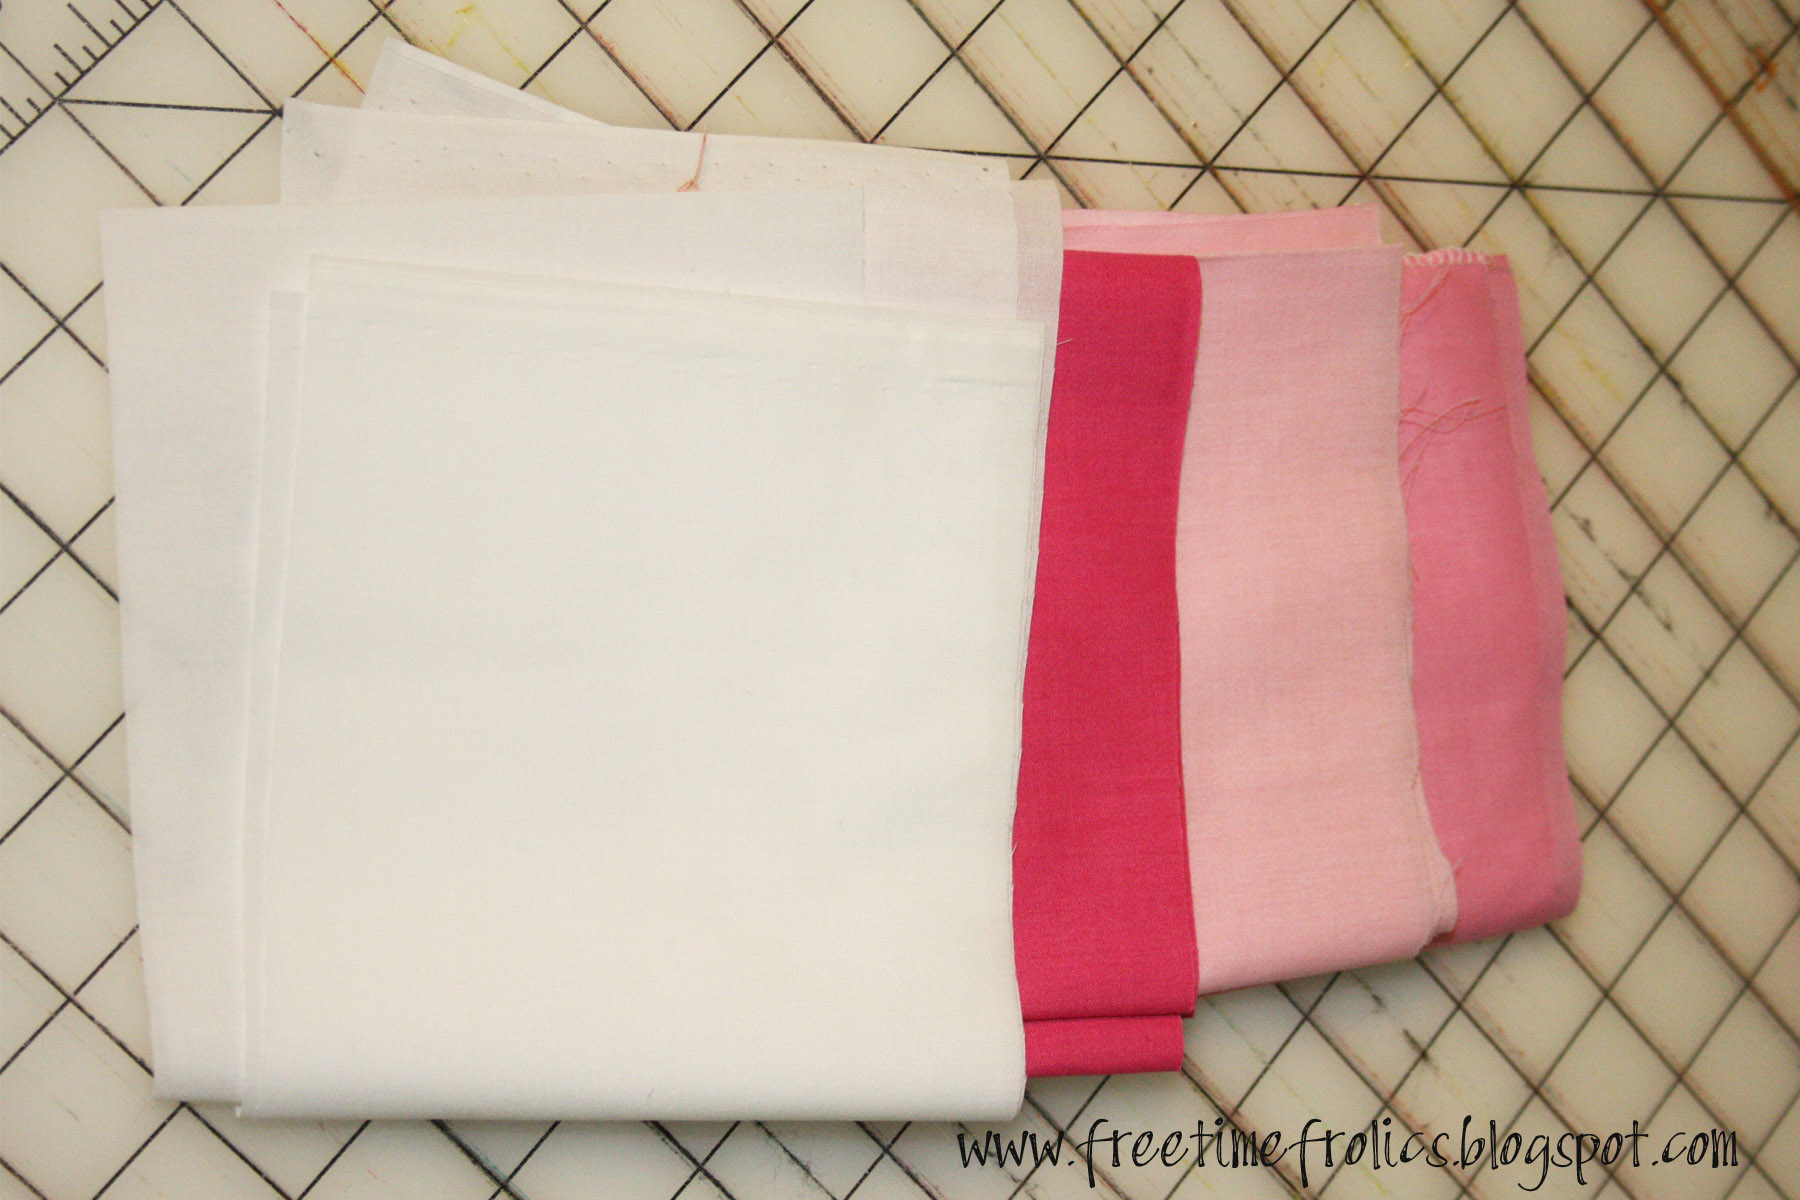
I started with 4 color strips. White, Pastel pink, Med pink, Hot pink.
About 5 x 90 inches each.
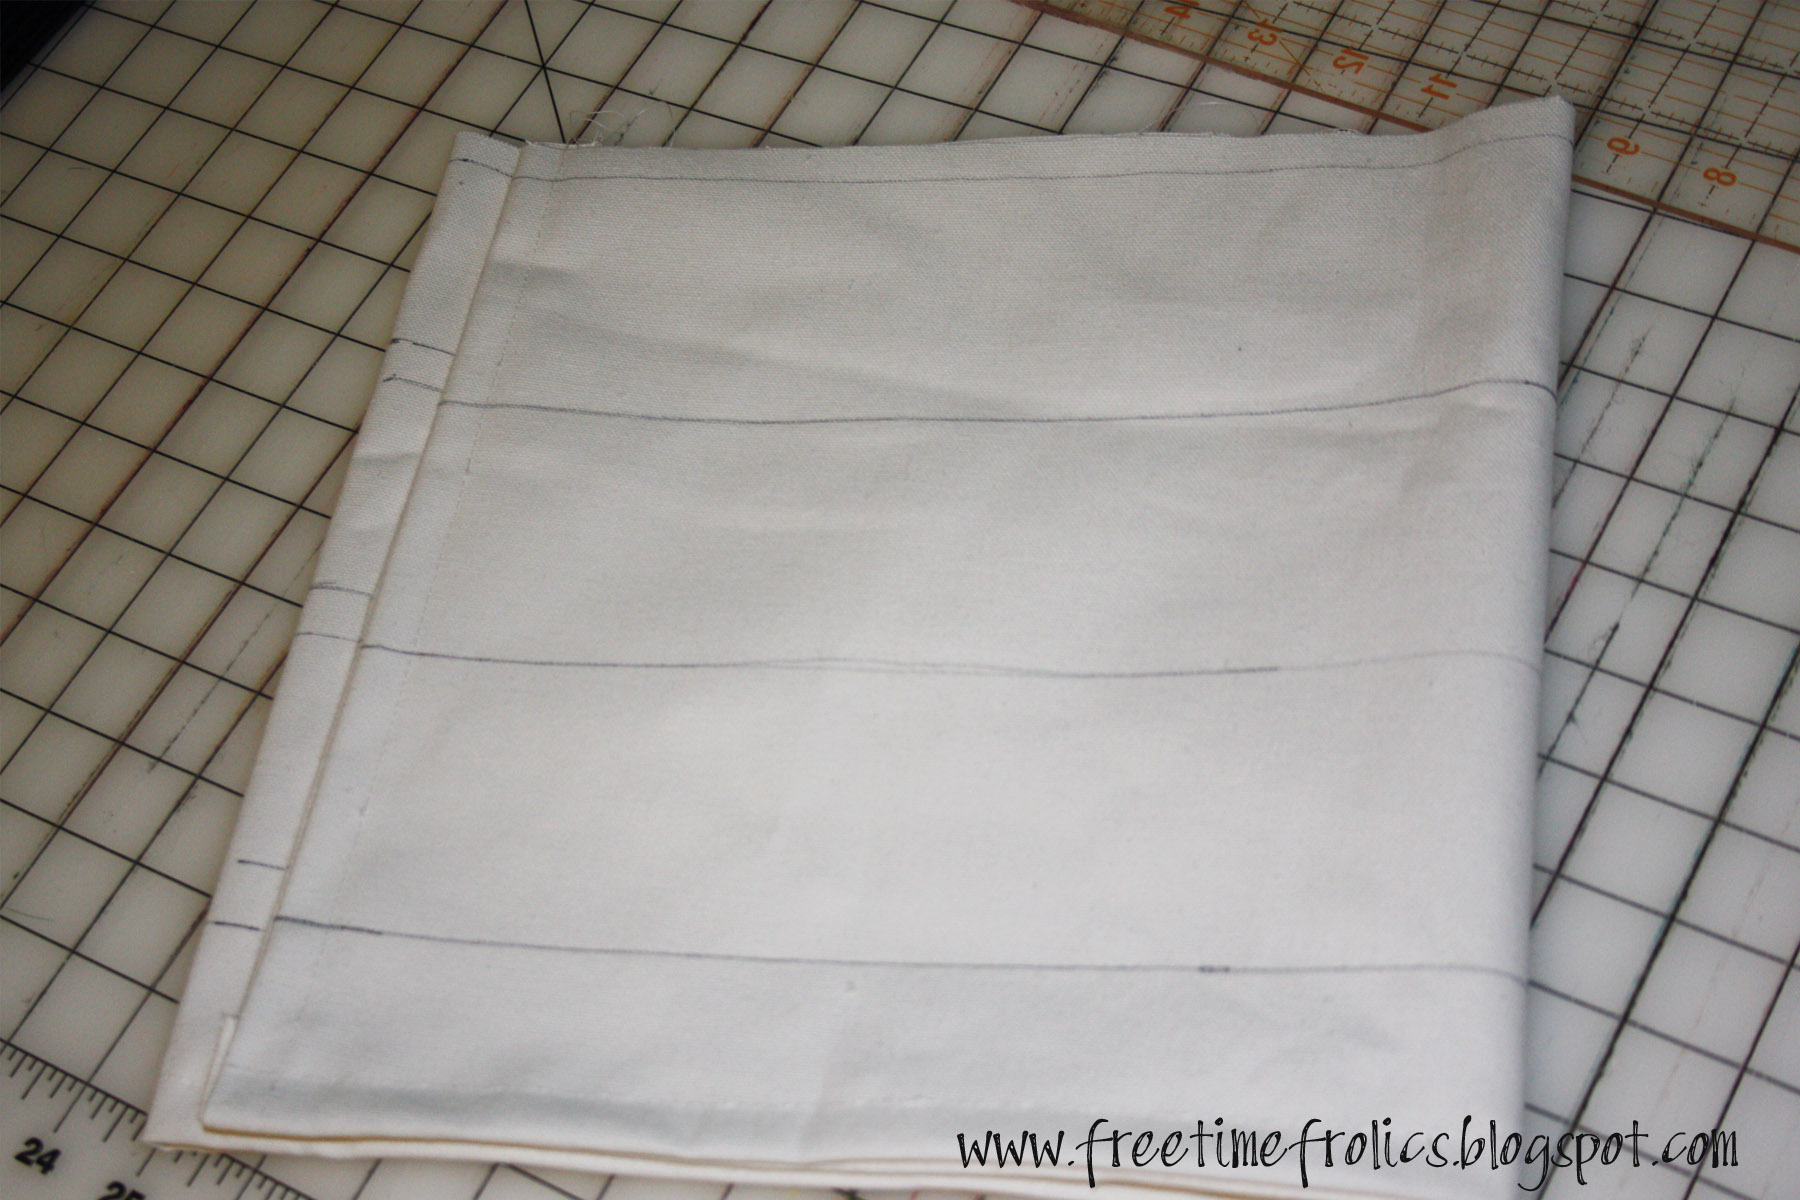
I cut 1 piece of canvas the width of my window x 12 inches.
From the bottom I measured up 2 inches and drew a line across the width of the canvas.
Next measure 3.5 inches and draw another line. Repeat 2 more times.
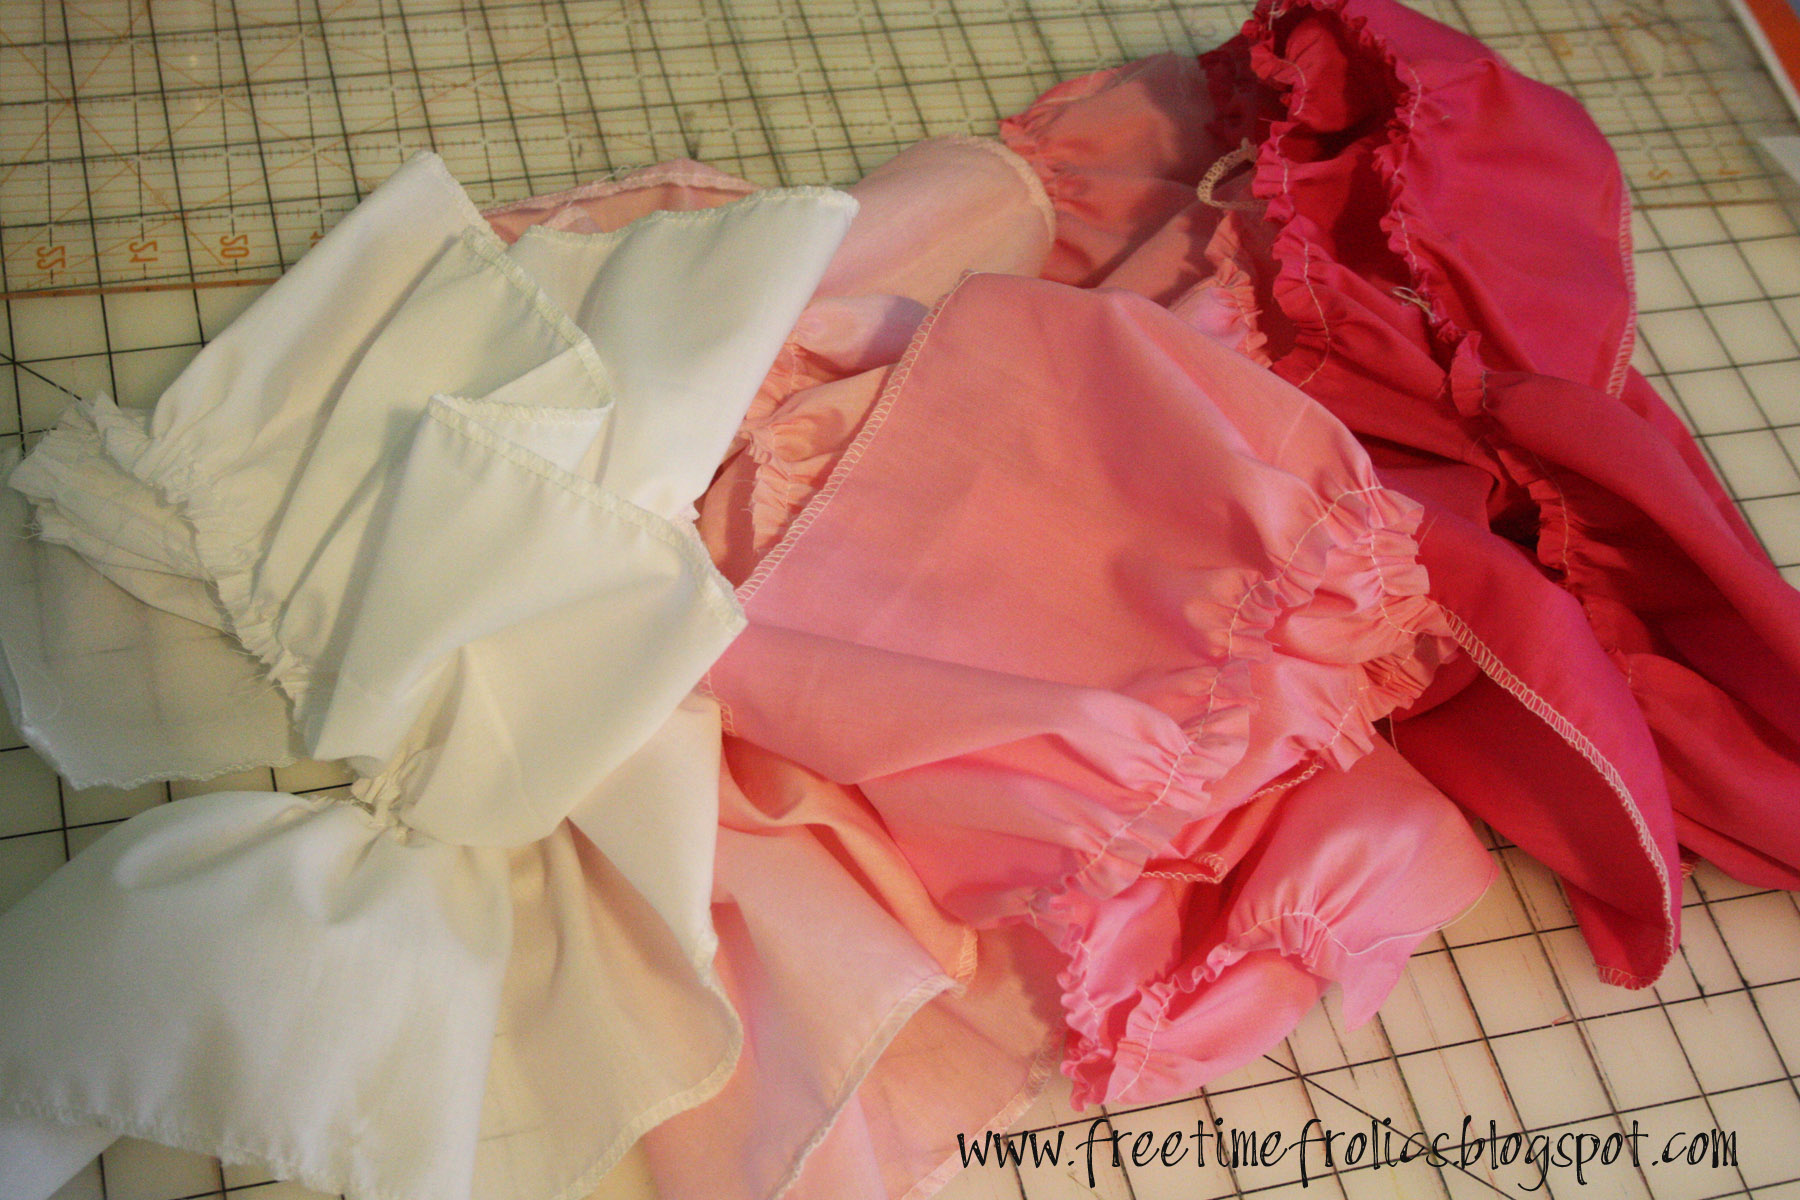
Next hem along 1 long edge of each color. Bast stitch along the raw edge.
Pull your basting string to gather your fabric strips.
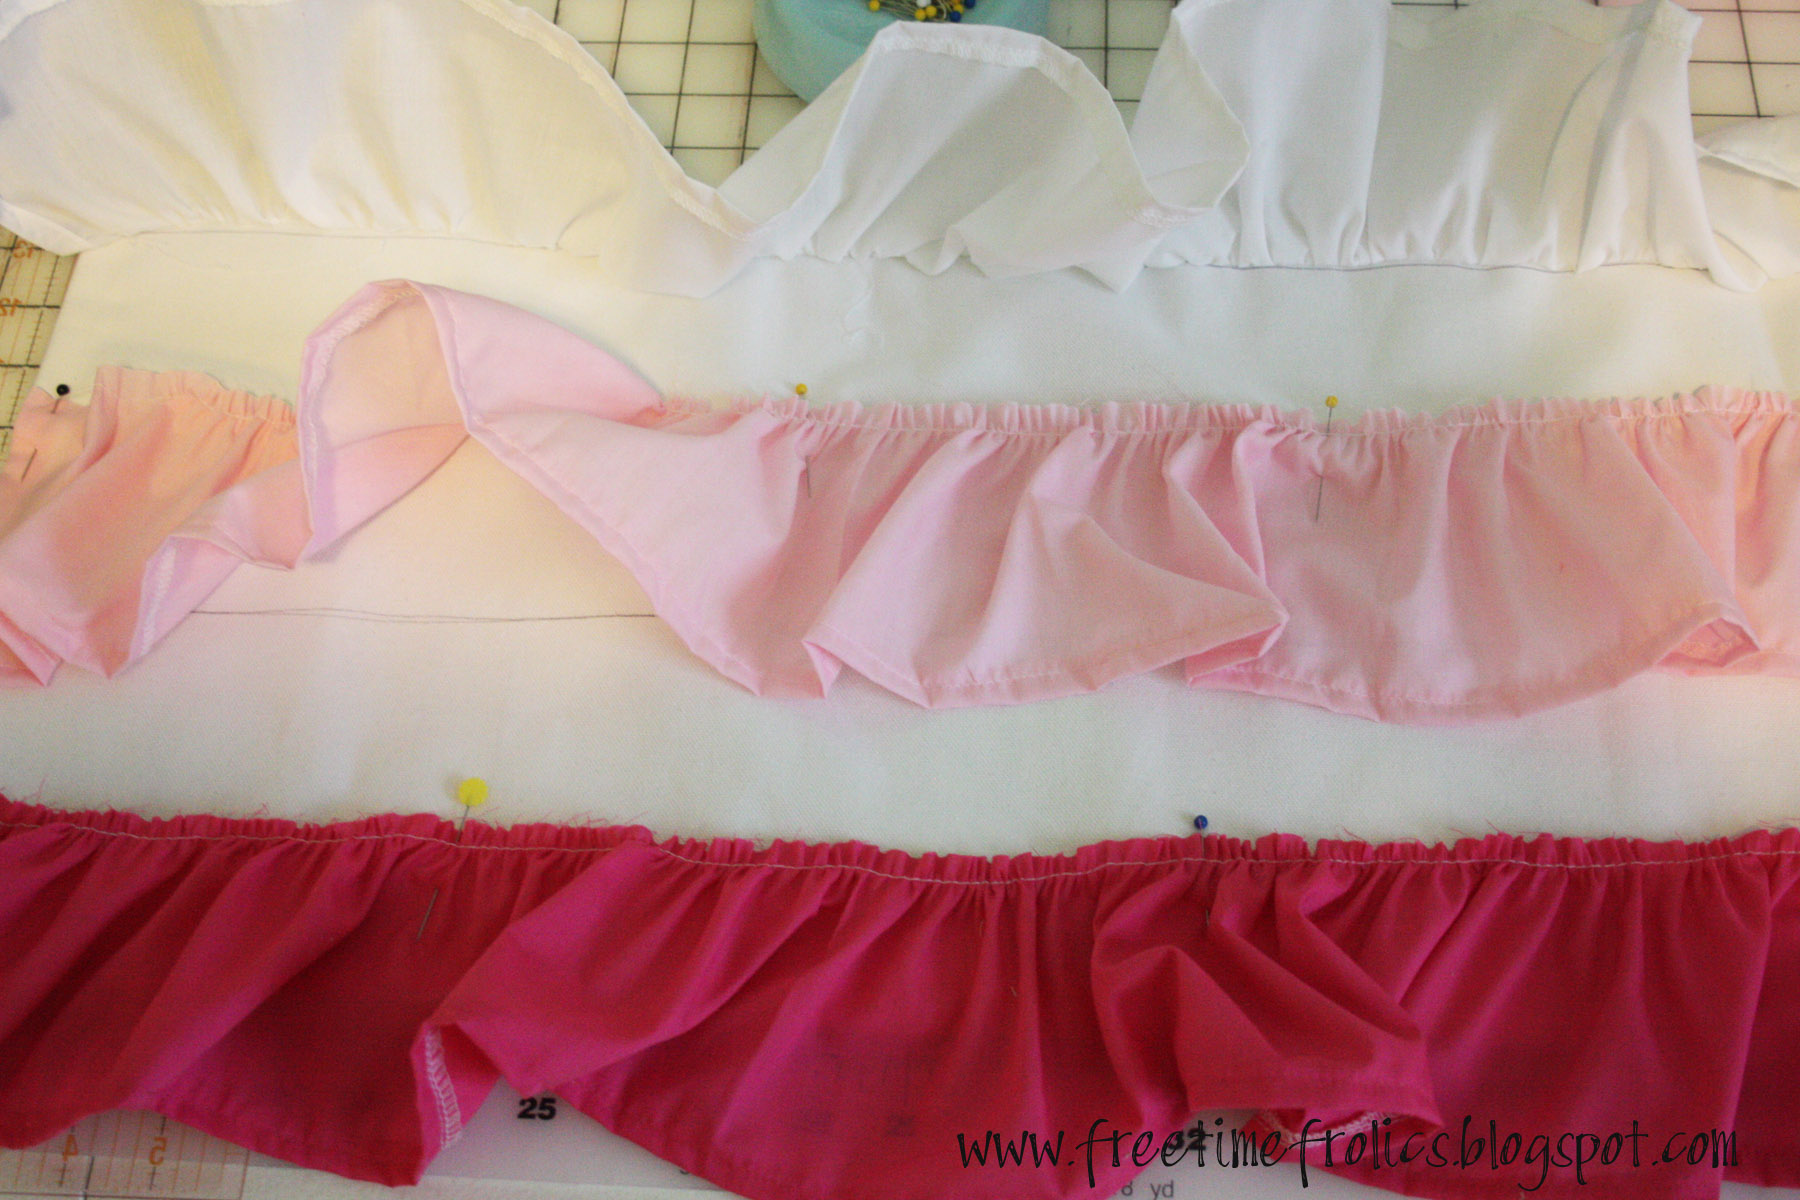
Lay your bottom fabric on to canvas. Pin one fabric strip to edge of canvas matching
up drawn line with raw edge.Pull basting thread from end until it lines up with edge of canvas.
Sew strips down with a zig zag stitch. Repeat for remaining strips.
For the rod pocket, I cut a strip 3 inches by width of curtain.
I laid the strip on top of the curtain.
(make a sandwich:canvas, strip canvas)
Stitch along edge to sew layers together.
I folded the 3 inch canvas up and around to the back.
Then to stitch rod pocket down I did a stitch in the ditch.
(This means you stitch in the folded over seam. You generally will not even see the seam.)
Hang it up and your done.
I love the way mine turned out. It is the perfect size and color for my room.
Next up Ribbon Redo!