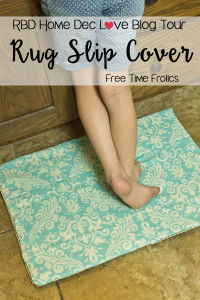
For today’s project I decided to get rid of my ugly rug and turn it into something amazing. I didn’t want to have to buy a new rug so I made a simple slip cover to make it match my style. I tried this once before with my large rug. The great think about this one is it is fast and easy to make with a small rug. It has an open bottom for easy removal and washing. I started by finding these amazing fabrics at Riley Blake Designs.
Modify Ink- Beautiful Art your way
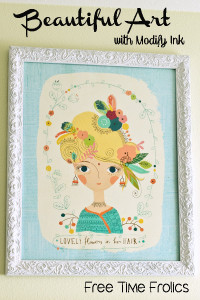
When decorating a room in your home do you ever think “Oh I love that print but it is the wrong color” Or “I wish the print included this color it would be perfect in my house”. A few weeks ago I meet the company Modify Ink. After chatting with them and checking out the product they have, I was sold!
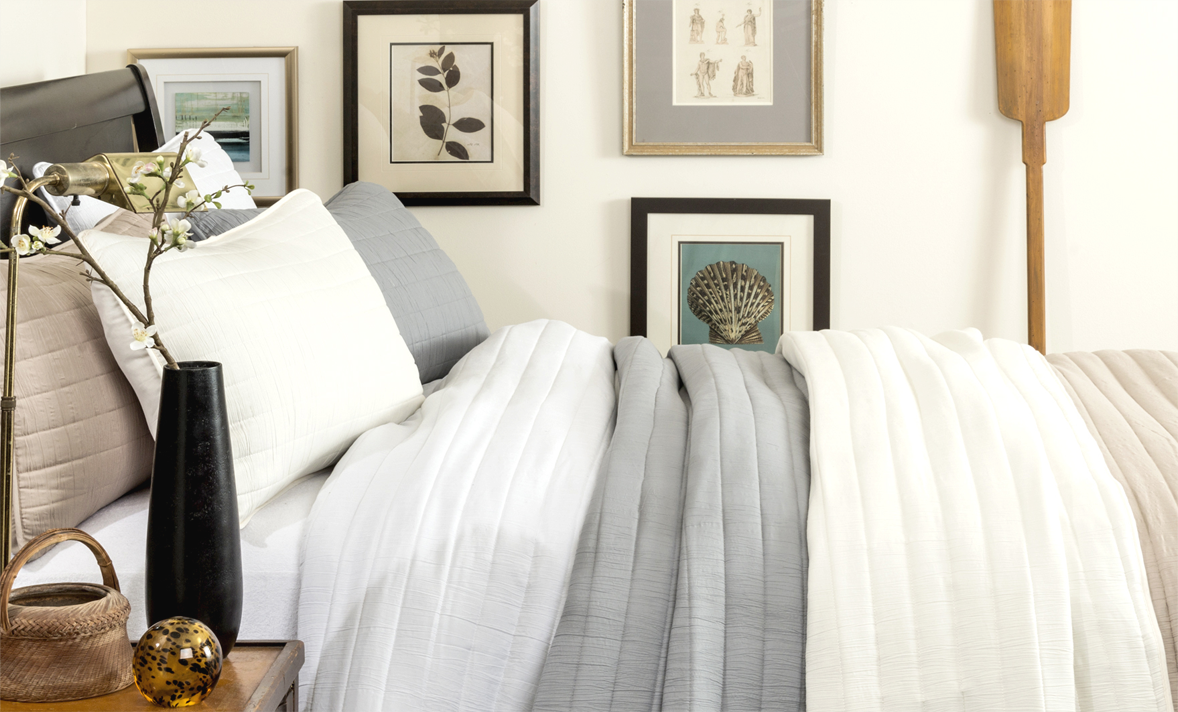
A new look.. Lush Decor $200 Giveaway
Do you ever get the new year blues? Christmas is over, it’s cold out side and we are all stuck inside. For me that means I want to change things up a bit. I want to paint walls, change bedding and decor. Sometimes I make all of my own stuff but sometimes it is just easier to find a great deal on the web and order it! Well if you fall into the latter category then this post is for you!
How to make Grapevine Ball Decorations


I have this crafty friend. She makes all kinds of great things on a whim. Every time I go to her house she has something new to show me. She is super talented at painting and jewelry making. (Both things not my strong point.) But one day I saw these cool grapevine orbs. She has 2 of them sitting on her porch. The first question out of my mouth, “Where did you get those?” They were truly amazing. Then she preceded to tell me she made them. My heart stopped knowing I was unable to make them because the snow had already begun to fall. So no more grapevines for the season. So I kept this beautiful spheres in the back of my mind until fall.
So this year I have been anticipating this project! I visited family who had grapes and harvested the vines myself and a few grapes too!

Start off with a bunch of grapevines. Cut the ones that are still a little green. They are more pliable. I soaked mine in the bathtub to make them soft. It worked pretty well.

Next shape them into 3 circles using wire. I decided to make mine about 2 feet in diameter. I started with wiring 2 vines and just kept adding them until I felt they were sturdy.

Next place one inside the other, crossing on the axis. Wire your circles together at the axis. Once they are wired together set them out in the sun to dry. I sat mine under some outdoor furniture to hold my spheres in the shape I wanted.
To make them look like pumpkins I added a small bundle of sticks to the top as a stem. In the winter I will take them off to look like snowballs.
Once they are dry use them to decorate your porch or cabinet tops. string them with lights for decorations for the holidays.
Today I have also teamed up with my favorite bloggers to bring you our all about Fall Post. Check them out.

Halloween & Fall Display @ Choose Craftiness
Pumpkin Fall Dessert @ Hollyhocks & Honeybees


Check out the entire post on my blog www.freetimefrolics.com
Royal Design Studio Stencil Review & Closet Makeover


A closet Makeover is just what I need! These past few weeks have been crazy busy for me. My kids have been out of school for spring break and that alone makes life crazy. I have had an itch to work on my closet. It is crazy unorganized, dark and blah. It is huge and can fit 2 full sized mattresses end to end. Let me also say “I am a blogger and I am unorganized”. There I said it. I may need an 8 step program or something. I am a blogger and I am unorganized. My house is rarely tidy. I have 4 kids and projects to do. Much more fun than walking around with a dish cloth in my hand all ..day…long. Bless those of you who do. I am just not that type of person. I would like to be but not enough to give up what makes me happy! So onto my unorganized closet… and a giveaway!
My closet was, well, out of control. The lights did not work. Just cheap contactor lights. To many clothes. I have been hoarding them since I got pregnant (3 years ago). You know wishing, hoping & praying that someday I would fit into them again. And a bunch of other things that don’t belong in a closet. I just decided that it was time to purge the old stuff. I was inspired by this E-book to get my fashion on. Here. And Royal Design Studio stencil to make my closet beautiful.
Here is a picture of my closet before. I had to use a flash due to a broken light fixture.

See how crazy it was! I really needed an intervention.
Royal Design Studio graciously sent me a Stencil to try out. They have tons of choices. One for every style. You will get lost in all the patterns they have. Here is the one I picked:
Casbah Trellis Moroccan Stencil from the Allover Moroccan Stencils Collection… I have been in love with this stencil for along time. I love its simplicity.
I started with painting my wall with an all over mint color from Lowes. I used Lowes white for the stenciled color. I used one of there sample cans for the white. I had plenty to spare. It was delivered lighting fast. Only 4 days and it was knocking at my door. The stencil was much larger than I thought. Which I was grateful for. I had a big wall to cover! It came rolled up in a large box ready to use. The instruction sheet included was very helpful to me. It included tricks and information on using there stencils. I also checked out there HowTo Stencil on there website. The stencil was made of thick flexible plastic and was very light weight. Definitely a quality product. Made to be reused.

I started along the top of wall and worked my way down and across. Matching up the edges. I used painters tape to hang my stencil. I wish I would have gotten the spray adhesive to hold my stencil on the wall. It still turned out great but having the adhesive would have been nice. Isn’t this stencil beautiful. This picture, taken from my phone, it’s a little grainy. (Sorry) I used a small rolling foam brush to roll on the stencil. Some places are lighter than others. I love it that way. It gives it a weathered look. It is very subtle on the wall but packs a punch. Over all it was simple to use. After each section I used a wet rag to wipe the back of the stencil for any residual paint. My stencil is still in great condition and ready to use again. Maybe another project in the future???
So here is my finished closet. I am in love with the stencil. At first you almost think its wallpaper. Until you are up close. I decided to go with an accessory wall. I had 2 matching frames made. One for a mirror and one for a peg board to hold my necklaces. I also used a bathroom towel rod for my scarves and 2 cabinet knobs for hanging purses.

Isn’t it amazing?! I cleaned out 3 garbage bags worth of clothing. Got rid of the things that just don’t belong. I got a new light fixture at Lowes. Along with some wicked amazing daylight light bulbs


For my bins I got them at Wal-Mart for $5 each. I used my Silhouette to label the bins according to what am keeping in them. Just in case my husband decides to do laundry. He will know where everything goes.


I love My closet makeover so much I just want to sit on the floor of my closet and listen to music as I enjoy the beauty. Here is my view from the floor!

Burlap & Tulips…Springtime Decor

I just love springtime! I love the colors, holidays and the thought of summer just around the corner. Here in Idaho it is still cold. Snow on the ground and more snow is coming. It’s just that time of year. A little gloomy, muddy and grey skies. I need a little spring time decor. What better way to do that than to add some colorful flowers to my front door for under $10!
{Adore Him} Mantel
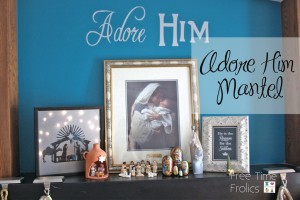

This years Christmas Mantel is is all about Nativities. I love Christmas Nativities. I have been collecting them for years.Countries like the Czech Republic, Mexico, Spain and Russia. I only have a few, but I really cherish them. The Framed art is a gift from my Husband for our First Christmas together. I added Vinyl for the “Adore Him” on the Mantel wall. So here is my Adore Him Mantel!


I added my Little People Nativity for the kids and our Santa village.
I used my “He is the Reason” Printable and my Shadow Box Nativity to top off the Mantel. You can find them Here and Here.
Washi Tape Ornaments
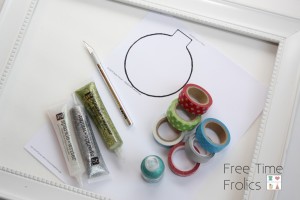

I love Washi Tape!! I love to make projects with Washi Tape. It is inexpensive and really packs a punch! this season I decided to make a Washi tape Ornaments.
What you need:
Washi Tape (Michaels has great new festive tapes this season. Just ab out any Christmas color you can think of, even gold and silver)
Foam core ( I get mine at the dollar store)
Exact-o Knife
Modge Podge
Frame
Ribbon
Opt: Vinyl saying

I first took an old frame I had and covered the glass with white paper. Missed this picture but you can just imagine it.
Next I found some ornament shapes on the Internet and printed them. I flipped them wrong side up and covered the paper with washi tape. Then cut them out.

Take some modge podge and glue the ornaments to a piece of foam core. I got mine at the dollar store. Let the glue dry. Putting them on the foam core makes the jump off the page. Not so flat.

Once the glue is dry use an Exact-o knife and cut around the edge of the ornaments. To give my ornaments a little sparkle and texture I used glitter glue pens to dot the polka dots, and lines on the washi tape. It is hard to see in the pictures but in person they look great.

Once your ornaments are cut out, place them on your frame. I played a little with the placement until I liked it.

Add some ribbons for strings and bows with glue dots.

Once I got this far I thought I would be happy but I decided to add the Phrase Merry & Bright to my frame. I think it finished it off perfect!!! I just love how it turned out.


Check out the entire post on my blog www.freetimefrolics.com
Fall Mantel

I know I am a little late getting this post up. My Mantel has been falling behind. So many things to make and do for the holidays. Here is my simple Fall Mantel this year.


I used my Thankful trees from last year. My Free Fall Printable. A cute set of pilgrims and 2 stacked wicker pumpkins. I kept it simple and easy this year. I can’t believe it is already time to decorate for Christmas. This fall has gone by way to fast.


Check out the entire post on my blog www.freetimefrolics.com
Itsy Bitsy Spider Door Decor

This year for Halloween I wanted a little something different for my front door. There are some many cute wreaths out there. I love them all. I was wanting something a little more non traditional. I found my idea at the Dollar store.
Here is what you need:
2 googly eyes
spool 3/8 inch black ribbon
Foam pumpkin
Spider web
Hot Glue
Dowel or skewer

Start by wrapping your ribbon on to a skewer or dowel like in this post: Here {Spider Hair Clips}
After baking your ribbon cut into 8 equal parts.

Take a skewer and punch a hole into the pumpkin. Use the skewer to push the ribbon inside. Use a bit of hot glue to secure the ribbon into place.

Add your googly eyes.
Depending on how long you want your spider to hang, cut your ribbon accordingly.
Use the skewer to punch the ribbon through. Dab some glue to the hole and ribbon to secure.

Your spider is ready to hang.
Add your Spider web and your new spider has a home!

I added mine to my front door. Not quite your traditional door decor. But sometimes I am not so traditional!

Don’t forget the Masquerade Ball is up and going. Stop by and link up your favorite Handmade Halloween Costumes. Some serious prizes are up for grabs. Will one go to you???


![]()
Check out the entire post on my blog www.freetimefrolics.com