Thanks Holly and Nat for inviting me! I love this song! I think this is one of the first songs I fell in love with as a kid at Christmas time. This was a bit of a challenge but here is what I came up with.
Washi Tape Ornaments

I love Washi Tape!! I love to make projects with Washi Tape. It is inexpensive and really packs a punch! this season I decided to make a Washi tape Ornaments.
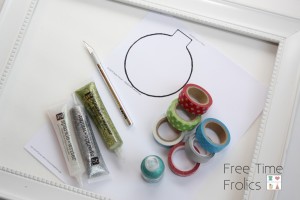
What you need:
Washi Tape (Michaels has great new festive tapes this season. Just ab out any Christmas color you can think of, even gold and silver)
Foam core ( I get mine at the dollar store)
Exact-o Knife
Modge Podge
Frame
Ribbon
Opt: Vinyl saying

I first took an old frame I had and covered the glass with white paper. Missed this picture but you can just imagine it.
Next I found some ornament shapes on the Internet and printed them. I flipped them wrong side up and covered the paper with washi tape. Then cut them out.

Take some modge podge and glue the ornaments to a piece of foam core. I got mine at the dollar store. Let the glue dry. Putting them on the foam core makes the jump off the page. Not so flat.

Once the glue is dry use an Exact-o knife and cut around the edge of the ornaments. To give my ornaments a little sparkle and texture I used glitter glue pens to dot the polka dots, and lines on the washi tape. It is hard to see in the pictures but in person they look great.

Once your ornaments are cut out, place them on your frame. I played a little with the placement until I liked it.

Add some ribbons for strings and bows with glue dots.

Once I got this far I thought I would be happy but I decided to add the Phrase Merry & Bright to my frame. I think it finished it off perfect!!! I just love how it turned out.


Check out the entire post on my blog www.freetimefrolics.com
Buddy The Elf!!

I find as I get older, the idea of Christmas is Nostalgic to me. I yearn for a Vintage Christmas. Lots of Snow, Real Christmas Trees, handmade Ornaments. You know the kind we had when we were kids. I loved watching Christmas movie, seeing Santa and driving around to see Christmas lights. So this year I am trying to make a less commercial and more down home Christmas. I love sharing old movies and music with my kids. One of my favorite movies is Buddy the Elf. I realize its not super old but its older than my kids. So to them its Vintage. Buddy makes me Smile!
Today I am sharing my favorite quote from the movie! Enjoy! Just Right Click on the image you want and save to your computer.


PLEASE follow the following rules for Free Time Frolics printables:
- I would love for you to become a follower of Free Time Frolics via Rss or Facebook. More Free Printables are coming. You don’t want to miss out.
- Free Time Frolics printables are for PERSONAL USE only. You may not re-sell, re-distribute, or claim them as your own.
- If posting on the internet, you MUST post a link back to the original post or this page.
- Freebie printables are offered “as is” unless otherwise noted.
- Pin, share, use in your home or as a gift. Enjoy!
Lighted Shadow Box Nativity


This season I decide to make a Nativity table. I started collecting Nativities when I was flying around the world. I love the nativity. I love the simplicity and spirit they bring to my home. And they serve as a reminder of the reason for the season.

Here is what you need.
12×12 Shadow Box
black spray paint
string of battery operated lights (10-20 lights)
Glue dots
Etched Glass Vinyl ( I buy mine at Expressions Vinyl)
Vinyl Cutter
I started by picking my image in my Silhouette Designer. I decided on this Nativity scene. I sized it to fit my frame. I cut my etched glass vinyl according to my Silhouette guidelines.

After cutting I used my transfer tape and cover the whole image. I wanted to have my glass with the negative space frosted. I found this to be the easiest way to use the negative space with the least amount of application problems, Peel your vinyl and tape from the backing.

Apply your vinyl to your glass. Start in one corner and rub out any air bubbles as you go. Once you have added your vinyl, you are going to remove your print. I removed just the picture.
Remove the print slowly. If you pull to hard or fast you can tear the vinyl you want to stay. Once you have removed all the vinyl you need to set it aside.

Next I painted my frame backing black. Just one quick coat. Start with your lights and stick a glue dot where you want to start your lights. I started mine on the side so my battery box can set on the table behind the box. String your lights throughout the backing board using glue dots to hold the lights down. I tried to make mine look like stars in the sky. Use glue dots to hold the wired against the board.

Add your backing to the frame and you are done.

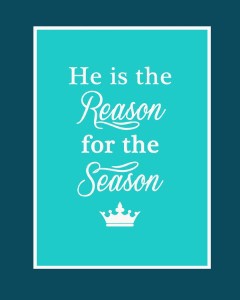
I added my free printable, “He is the Reason for the Season” Find it here.

Check out the entire post on my blog www.freetimefrolics.com
He is the reason… Printable
This week has been a crazy one. I had a major project fail. Then I figured a new way to do it. Yeah! I will have it up soon. So because my project didn’t go as planned I am starting with a printable this holiday season.
With the Christmas season is just around the corner. I though I would start mine off with a free Printable. Since the Christmas season is celebrating our Savior’s birth. “He is the Reason for the Season.”

I made a few different colors. Hopefully one will fit in your house!
Right click and save to your computer. Print at your favorite photo center. Prints as an 8×10. Please follow the free printable guidelines below when using Printable’s at Free Time Frolics.
Thanks!


PLEASE follow the following rules for Free Time Frolics printable’s:
- I would love for you to become a follower of Free Time Frolics via Rss or Facebook. More Free Printable’s are coming. You don’t want to miss out.
- Free Time Frolics printable’s are for PERSONAL USE only. You may not re-sell, re-distribute, or claim them as your own.
- If posting on the internet, you MUST post a link back to the original post or this page.
- Freebie printable’s are offered “as is” unless otherwise noted.
- Pin, share, use in your home or as a gift. Enjoy!
Once there was a Snowman……Kit!
Well I am back again for another day of Corn Week. Today we are going to talk Snow. That’s right snow. You might think I’m crazy but you are going to love this easy project. Even the kids can get involved.

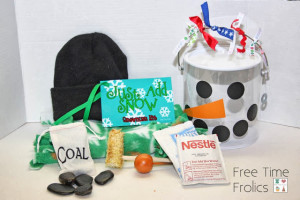
Everyone loves a snowman right??? When I was in college I had a snowman. His name was Winston. We had fun dressing him up and having him as our mascot. As an adult I enjoy going out on a snowy day and building snowmen with my kids. So a few years ago I came up with a fun little snowman kit. Complete with a corn cob pipe and a button nose. I used them as my neighbor gift to my neighbors with kids. The key to my kit is to start planning now. So here is your supply list.
5×54 inch fleece or old scarf
Dowel knobs and Dowel (Size or dowel knob opening) for eyes
Large Button – You could also buy a carrot for the nose.
Rocks painted black for mouth. You could also use these for your eyes.
Hat- I like to use the 99 cent beanie hats at walmart
Corn on the cob (This is why we start now)
Corn on the cob (This is why we start now)
Corn Cob Pipe
Start with you corn on the cob. Make sure to enjoy every bite. Thr butter, the salt every last yummy taste of summer. Once you have enjoyed your yummy delicious corn, cut your cobs into halves or thirds.
1.Trim off any access corn and leave your cobs out to dry. It may take a few days. You can also put them on low heat in your oven for several hours.You want them dry enough to drill holes in them. You can even dry them out and put them in a ziploc bag until you area ready to make them for Christmas.
2. When they are dry you will drill a hole in them, the same size as your dowels.
3. With a hot glue gun add a bit of glue in the drilled hole.
4. Add your dowel and let dry.
5. Opt. You can spray your dowels with sealer. This will help them last longer in a wet winter.
Eyes and Mouth
For the eyes and mouth have your kids gather some rocks from your yard. Wash them and paint them black. Or buy some dowel knobs and dowels. Paint them black. Either way your kids will love to collect rocks give them a bath and paint a shiny coat of paint on them. You can also pic up a bag of rocks from the dollar store. They oftern have decorative rocks in black. They are perfect for a snowman.
Nose:
For your button nose you can buy a button or a carrot. I am using a button that I am going to glue a dowel on the back so it stays in place on my snowman.
Scarf
You can either use an old scarf or a long pieces fleece.
Whatever you fancy. I used fleece and cut the edges. I had my kids sit and tie the ends into knots.
Hat
I like to use the cheap beanies from Walmart. But you could also make one out of foam or felt. For instructions on how to construct a hat See this post.
Add all your pieces to a fun little draw string bag or bucket. Add the tag and you are ready to make a snowman. I added a vinyl face to my bucket or you could use iron on vinyl for a bag. No cutter needed just hand cut and apply. I love getting my vinyl here. You can get all kinds and colors. A lot or a little you choose.


A fun little addition would be to add hot cocoa or cider to your bucket or bag.


Right click each one and save to your computer.
Please remember to follow the rules of free printables.
For more information please see my free printables page.
Please remember to follow the rules of free printables.
For more information please see my free printables page.
Home Made for the Holidays: Day 11: Stockings and Wrapping
Stockings have been a tradition for decades. And there are lots of theories about why we do it. Whatever your reason it is a loved tradition.
Stockings are so hard sometimes. I like to have fun sensible things in my kiddos stockings. Some are traditions that I have had since Iwas a kid others are new things we have added as our family has grown.
Here is a list of things I like to use.
1. Pudding snack: I like to use this because if you open presents one at a time like I did as a kid you get really hungry. At one time for a few years there were 10 of us. We had a yours, mine and ours family. Christmas morning went on for hours. Pudding taste good and it give your your milk. LOL. I guess.

2. Orange or Raspberry chocolate sticks. By Sweets Candy. I love these things. They usually cost about $3 and fill the stocking. For as long as I can remember I have gotten these little beauties for Christmas. Now as a mom I do the same for my kids. They love them too. On a side note: If you live in Salt Lake City you can go on a tour of the Sweets candy factory located in West Valley. You can buy these yummy treats in Bulk and other treats. ie. Chocolate covered Cinnamon Bears. If you haven’t had one, You must try. They are delightful.

3. Gift cards: My boys are hitting the age that they want a choice in the things they want. This year its the app store.

4. Dollar Store items: I like cheap easy toys, that I don’t care if I throw them away a month later. Walmart has a selection of $1 toys and activities. That prove to be pretty goods and the kids enjoy them.
5. Electric Tooth Brushes: I love to buy electric tooth brushes for Christmas. My kids love them but sometimes they can be a bit pricey. So for Christmas I splurge a little bit. My kids like getting them because they are electric and usually there favorite super hero or character and they get a new toothbrush that makes mom happy. All is good in the world.
6. Head phones: I like the idea of head phones. They are small. Can be inexpensive if you want. And when there video game of MP3 player is to loud. They have there very own pair of headphones to use.
7. Oranges. Every year for Christmas I woke up to an orange in the toe of my stocking. Another yummy treat to eat when opening gifts. These also go great as a gift to a neighbor or to kids given along with the book the Christmas Orange. It was written by a lady I knew as a child. A very sweet story.

Here are a few more links to other stocking options. Lots of things to choose from. I hope your holiday season is filled with family, friends, good food and lots of lovign memories!
For Wrapping those beautiful gifts head on over to:
My Sister’s Suitcase
for some fantastic ideas and a giveaway.
Don’t forget our other giveaways. Here is the List.
Don’t forget to come back tomorrow for our Family tradions link party. We have a fantastic prize to one lucky winner. A gift pack from Pick Your Plum. A suprise box your going to love!
Be sure to come back and bring a few friends with you!
Check out the entire post on my blog www.freetimefrolics.com