Free Time Frolics

  • PRINTABLES
  • EAT
  • House
  • Make
  • Sewing
  • LDS
  • Home
  • About
  • Pr/Advertise
  • Contact
  • Shop
  • Store

12 Tips for Traveling with Kids

November 20, 2013 By: Freetimefrolics

12 tip to traveling with kids www.freetimefrolics.com
12 tips for traveling with kids www.freetimefrolics.com
Over the River and through the woods to Grandmother’s house we go…. I love that song but oh how times have changed.  Back when you took a sleigh and horse to grandmas is a thing of the past and we would rather take our cars and airplanes to get there fast.  Back in my flight attendant day I loved seeing families heading out for the holidays. I learned a lot about traveling with kids and the ins and outs of airport travel.  The good and the bad.  So today I am going to share with you my tips and trick to navigating your travel plans with kids! Because we all know if the kids are happy in the air or on the road, Mom and Dad are happy too!

  May tips can be used for any trip.  Try them out with your family and wee what works best for you!

Before any Trip away from Home:
1. Have a family meeting- Sit down with your kids a day or two before you leave home.  Talk to your kids about your travel plans.  Set your expectations. Talk to them about where you are going, how long it will take, and what they will need. Make a plan as a family to help the kids have good behavior while traveling.  I loved this idea, Keep the Coins. This helps kids stay accountable for there own behavior and rewards them if they keep the family travel rules. What a brilliant idea!  Money can motivate.  Just be sure to stick with the program and follow through.
2. Always eat a healthy meal before you leave.  When families hit the road for the holidays or vacation they usually eat a lot of fast food. Start off your vacation smart and have a healthy meal. Your kids will be happier if they have a full stomach.
Car travel:
A lot of families consider car time as family time.  Use this time to talk to your kids without all the pressure.  You will be surprised what your kids will start talking about in a casual conversation.
3. To keep your kids entertained try using Books on Cd.  Since my kids were about 5 they have loved listening to books on road trips. My husband and I even enjoy listening to them. Some of our favorites are Fablehaven, Percy Jackson, Adventures Wanted and the Tree house series. We use these books as a learning tool in our car.  Our boys frequently ask us to stop the book and ask us questions about what a word means or to explain to them what is happening if they don’t understand. Using these Cd’s as a learning tool has really helped their reading ability and school work.
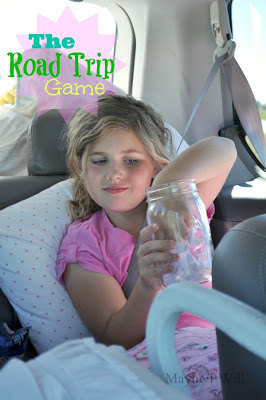
4. Play a game. Try playing a travel game.  Here are a few I found in the blog world. Some are free or very inexpensive.
Street sign Bingo Printable
I Spy Travel Game Printable
License Plate Travel Game
Road Trip Jar
The Road Trip Jar-- 110 Fun Questions and Games to Keep Kids entertained on long road trips for the holidays!! My kids LOVE this and are so well behaved when we pull out the jar!!! #roadtrip #familytime #familygames {www.maybeiwill.com}
Printable Travel Games
5. Pack a Healthy Snack:  When we travel I try to pack a small cooler of Healthy treats and snacks packed with Protein.  Cutting down on the sugar and increasing the protein can help cut down on tantrums and hungry kids.  We love packing Nuts, Jerky, String Cheese, Yogurt Tubes, 100% Juice, Water bottles, fresh fruits and veggies.
6. Most kids love technology, use a GPS or have a map that goes from point A to point B.  Show stopping points and rest stops on the map. Your kids can learn a little geography and  know how much further you have to drive before the next stop.
Amazon.com Widgets
Airplane
 
7. Plan your flights. Know your itinerary. If you can, try to get from point A to Point B in the shortest amount of time. Sometimes it costs a little more, but when it comes to your kids it may be worth it.  The less stops you make the fewer delays you will encounter.
8.  If traveling with a baby, be sure to pack a couple extra diapers, a pacifier or two and an extra outfit.  I use to pack one diaper for every hour I am on the plane. You will never be sad about having a few extras. I was asked more than once of we had diapers on board or had a baby taken off the plane wrapped up in a blanket because they blew out a diaper and there only outfit.
9. Before boarding the plane, play a game in the gatehouse with your kids. Kids always have extra energy.  Before boarding the airplane get them up and play Simon Says, use the bathroom, or have them do some exercises like jumping jacks or jog in place.  Burning off a little energy can go a long way.
10. When traveling on an airplane you want to travel light but also have what you need to keep your kids entertained. I let my kids have a small bag of things to do and snacks.  I like to have my kids bags ready to go.  I fill the bags with small wrapped toys and snacks with a time on them.  At the time designated they are allowed to open the next item.  Same goes for snacks. Her are a few travel friendly toys you can make.
Travel dinosaur play mat
Travel Race Track 
11. Know your car seat.  Be sure the car seat has airplane guidelines. Most car seats with a 3 or 5 point harness can be used on board.  If your seat is more of a booster, you will not be able to use it.  Save yourself the hassle and check it.
12. During take off  and landing have gum on hand for the older kids and a pacifier or bottle for the younger ones.  This will help relieve ear pressure and discomfort. Everyone on board will appreciate it!
Just remember your are traveling with kids.  They can be unpredictable and get frustrated when they are out of there element. Remember to be patient and just enjoy your vacation.


(Source)
What are your travel tips?

Easy, 5 Ingredient Pumpkin Bread Recipe

November 13, 2013 By: Freetimefrolics

easy pumpkin bread
I love Pumpkin Bread, it is one of my favorite treats. Especially this time of year.  I wanted an easy way to make Pumpkin Bread with out all the work.  I decided to try my hand at making this yummy treat with a light, airy texture and flavor.  This Pumpkin Bread came out perfect!

I started with 4 simple ingredients
1 White cake mix
1 15 ounce can Pumpkin
2 eggs
1 T. Pumpkin Pie Spice
1 Cup Chocolate Chips
Mix together your eggs, pumpkin and spice.  Add the cake mix and blend together.  Divide into two Bread pans. My pans are 9×4.  Bake @350* for 50 minutes or until a toothpick comes out clean.  Let your Bread cool completely before cutting. Enjoy one for yourself and share one with someone special!


Save Print
Easy, 5 Ingredient Pumpkin Bread Recipe
Author: Free Time Frolics
Recipe type: bread
 
Ingredients
  • 1 White cake mix
  • 1 15 ounce can Pumpkin
  • 2 eggs
  • 1 T. Pumpkin Pie Spice
  • 1 Cup Chocolate Chips
Instructions
  1. Mix together your eggs, pumpkin and spice. Add the cake mix and blend together. Divide into two Bread pans. My pans are 9x4. Bake @350* for 50 minutes or until a toothpick comes out clean. Let your Bread cool completely before cutting. Enjoy one for yourself and share one with someone special!
3.2.2929

Gold Tinted Mercury Glass DIY

November 8, 2013 By: Freetimefrolics

I love the look of mercury glass.  I have seen it all over in the store. It gives home decor that vintage feel.  I thought it would be fun to have some mercury glass mixed into my Holiday decor and with gold coming back in I thought I would try my hand at gold tinted mercury glass.  

I started with these glass Christmas trees I found at the thrift store.I washed and dried them first thing. Any glass items will do. 

I coated the inside of my trees with Krylon’s Looking Glass spray. 
Here is what my glass looked like after 1 coat. I let my glass dry for 15 minutes in my warm oven.  My weather has been very cold so I couldn’t let them dry outside.  I warmed my oven and turned it off, then placed my trees in the oven. After 3 coats I sprayed the insides with gold metallic paint and let it dry.

After they dry I added a flame less candle lights and a nativity and I am ready for the holidays!  I love how these turned out.  They add just enough gold to my holiday decor.
Also its that time of the month where I join forces with some of my blog besties and bring to you our round up of Gold Projects!  Check them out!
Ashley and Meegan @ Flats to Flip Flops- Gold Goodness
Emily @ Benson Street – Gold Bud Vases
Kaylynn @ Among the Youngs- Ooey Gooey Salted Caramel shortbread bars
Melissa @ Hollyhocks and Honeybees- Glittery Gold banner
Candice @ She’s Crafty – Gold Leaf Art
Adrienne @ Free Time Frolics – Gold Tinted Mercury Glass
Andie @ Maybe I Will – Golden Memories Display
Rebecca @ the Crafted Sparrow- Gold Wishbone Necklace

Linking up! {Here}
Check out the entire post on my blog www.freetimefrolics.com

Lace Sweatshirt DIY

November 1, 2013 By: Freetimefrolics

Diy lace inlay sweatshirt
After viewing this post from One Little Momma.  I am not really into the lace thing myself but for my little miss, Oh yes!  So I found a couple of cute sweatshirts for her and I was on my way.  I thought it would be fun to give her sweatshirts a little something more.  I just love how they turned out.  Perfect for my little miss!
 I started out with a sweatshirt from Walmart.  I love the designs they have this season.  I picked this cute owl sweatshirt from Hanes.
I picked out lace that complimented the graphic on the shirt. For the back of my daughters shirt I used 1/4 of a yard.
Lay the lace on the back of the sweatshirt and cut across the top of the shirt.  I also added elbow patches.  I thought they would give it a bit of character.
I used a glue stick on the back of the lace to hold it in place. I also pinned it.  Then take it to your sewing machine and zigzag around the edges of of the lace.

Super Hero Youth Leadership Training

October 30, 2013 By: Freetimefrolics

super hero printable and activit www.freetimefrolics.com

Super hero Leadership training

As a member of the LDS church and Young Women president, I am trying very hard to cultivate leadership in our girls.  We want our girls to see the strengths in themselves and others. In an effort to do this we planned an amazing leadership training. A night filled with super speakers and power treats!

[Read more…]

Witch-fest at Gardner Village

October 24, 2013 By: Freetimefrolics

A few weeks ago I traveled to Utah to attend a bloggers night out at Gardner Village.  If you don’t know what Gardner Village is, and you live close you have to check it out. 
gardnervillagea
Witch-fest is a amazing Girls night out, Family night or Date Night.  Witches, shopping, pony rides and yummy food.  
We started our night with Eric Dowdel, painter and Folk artist. He is an amazing speaker and Artist.  He signed and gave each of us his newest puzzle “Witchfest” in our swag bags.
source

Head over Gardner Village this weekend and check it out for yourself!

Linking up! {Here}

Almost Lasagna (Recipe)

October 21, 2013 By: Freetimefrolics

almost lasagna recipe www.freetimefrolics.com
Almost Lasagna REcipe-Freezer meal www.freetimefrolics.com
This recipe is one of my favorites!  It tastes just like lasagna but so much easier to make.  No lasagna noodles! Use noodles your family will love. You can add extras to pack a punch or just leave it the way it is for your picky eaters. Serve it up with a side salad and garlic bread and your meal is complete! I love doubling this meal and putting one in the freezer for when I need a quick dinner.

Almost Lasagna Recipe

Spaghetti sauce- 1- 20 ounce jar
4 cups cooked Pasta- your choice
1 Egg
1 C. mozzarella cheese, shredded
1 C. Parmesan cheese
1 C. cottage cheese
1 pounds hamburger, browned and seasoned
1/4 C. onion
1t. garlic powder
1/4 c. chopped peppers (opt)
Boil your pasta for half of the time on the box (do not over cook). While pasta cooks Mix remaining ingredients together in a large bowl. Add Pasta.  Stir until all pasta is covered in sauce and cheeses.  Pour into a 9×13 baking dish. Cover and bake for 30 minutes at 350*.
*For a freezer meal pour into a large Ziploc bag and Freeze.  When ready to bake, thaw and pour into baking dish.
For a little extra your can add fresh vegetables like spinach and mushrooms
Enjoy!
Save Print
Almost Lasagna (Recipe)
Author: Free Time Frolics
Recipe type: Main Dish
Cuisine: Pasta
Prep time:  20 mins
Cook time:  30 mins
Total time:  50 mins
Serves: 8
 
Ingredients
  • Spaghetti sauce- 1- 20 ounce jar
  • 4 cups cooked Pasta- your choice
  • 1 Egg
  • 1 C. mozzarella cheese, shredded
  • 1 C. Parmesan cheese
  • 1 C. cottage cheese
  • 1 pounds hamburger, browned and seasoned
  • ¼ C. onion
  • 1t. garlic powder
  • ¼ c. chopped peppers (opt)
Instructions
  1. Boil your pasta for half of the time on the box (do not over cook). While pasta cooks Mix remaining ingredients together in a large bowl. Add Pasta. Stir until all pasta is covered in sauce and cheeses. Pour into a 9x13 baking dish. Cover and bake for 30 minutes at 350*.
3.2.2929

Hot Drinks on Cold Winter Nights: Hot chocolate & Wassail Recipes

October 17, 2013 By: Freetimefrolics

cocoa and wassail recipes www.freetimefrolics.com
Fall and winter always mean Hot drink season. Over the years I have tried and tested many recipes for Hot cocoa and Wassail. With the holidays around the corner I thought it would be fun to share my favorite hot drinks for those cold winter nights, snowman making, or Christmas caroling.  First up is my favorite creamy hot cocoa mix just the way we like it!

[Read more…]

MIlitary jacket to vest, How to

October 10, 2013 By: Freetimefrolics

easy diy military vest www.freetimefrolics.com
A few weeks ago I went on a thrifting trip with a few friends.  I totally need fashion help so I was lucky to be thrifting with Ashley from Flats to Flip Flops and Meg from Brassy Apple. (check out there blogs…Amazeballs!)
I have been on the hunt for a military styled vest.  But have found nothing. Finally while out shopping I found this Military jacket for just $4.  Yipee!  I was so excited!

Making a vest could not be easier.  Just one step. Cut off the sleeves at the shoulder seam.  I did mine as close as I could.  That’s it.  Seriously.  So easy. I have paired it with jeans and a skirt.  I love it.
As I perused the internet I also came across the same idea from One Little Momma! Great minds think alike! Check out her easy to follow vest tutorial.
I also wanted to share some of my favorite jewelry.  I am kind of on a bracelet hunt.  I love bracelets. They just seem to dress up an outfit.  The two I am sharing today are my favorites.  The first one is my leather cuff from One Little Momma.  I met her at Snap.  She gave me this little beauty and I wear it daily.  I love it.  You can have one too by check out her etsy shop.
The second is from my friends Ashley at Flats to Flip Flops. She runs the Hudson foundation to help couples going through infertility the opportunity to do in vitro. Her bracelet of hope is beautiful.  Check out her story and shop and get one for yourself!

How to make Grapevine Ball Decorations

October 8, 2013 By: Freetimefrolics

I have this crafty friend. She makes all kinds of great things on a whim.  Every time I go to her house she has something new to show me.  She is super talented at painting and jewelry making.  (Both things not my strong point.)  But one day I saw these cool grapevine orbs. She has 2 of them sitting on her porch. The first question out of my mouth, “Where did you get those?”  They were truly amazing.  Then she preceded to tell me she made them.  My heart stopped knowing I was unable to make them because the snow had already begun to fall. So no more grapevines for the season.  So I kept this beautiful spheres in the back of my mind until fall.   
So this year I have been anticipating this project!  I visited family who had grapes and harvested the vines myself and a few grapes too!

Start off with a bunch of grapevines.  Cut the ones that are still a little green.  They are more pliable. I soaked mine in the bathtub to make them soft.  It worked pretty well.
Next shape them into 3 circles using wire.  I decided to make mine about 2 feet in diameter. I started with wiring 2 vines and just kept adding them until I felt they were sturdy.

Next place one inside the other, crossing on the axis. Wire your circles together at the axis. Once they are wired together set them out in the sun to dry.  I sat mine under some outdoor furniture to hold my spheres in the shape I wanted.

To make them look like pumpkins I added a small bundle of sticks to the top as a stem.  In the winter I will take them off to look like snowballs.
Once they are dry use them to decorate your porch or cabinet tops. string them with lights for decorations for the holidays.

Today I have also teamed up with my favorite bloggers to bring you our all about Fall Post. Check them out.


Halloween Mantle @ The Crafted Sparrow
DIY Memory Banner @ Maybe I will
How to Make Grapevine Ball Decorations @ Free Time Frolics
Halloween & Fall Display @ Choose Craftiness
Pumpkin Fall Dessert @ Hollyhocks & Honeybees
Candy Corn Crate @ The Benson Street
Butternut Squash Mac & Cheese @ Among the Young
What’s Trending for Fall 2013 @ Flats to Flip Flops


Linking up! {Here}
Check out the entire post on my blog www.freetimefrolics.com
  • « Previous Page
  • 1
  • …
  • 20
  • 21
  • 22
  • 23
  • 24
  • …
  • 49
  • Next Page »
  • Facebook
  • Google+
  • Instagram
  • LinkedIn
  • Pinterest
  • StumbleUpon
  • Twitter
  • YouTube

Shop my Moji LIfe

Shop my Plexus

SEARCH MY BLOG

INSTAGRAM @Freetimefrolics

MY RECENT PINS

Visit Adrienne {FreeTimeFrolics.com} Blogger's profile on Pinterest.

Categories

Archives

FOLLOW ME HERE

  • Facebook
  • Google+
  • Instagram
  • LinkedIn
  • Pinterest
  • StumbleUpon
  • Twitter
  • YouTube

Copyright © 2026 · Modern Blogger Pro Theme By, Pretty Darn Cute Design