Free Time Frolics

  • PRINTABLES
  • EAT
  • House
  • Make
  • Sewing
  • LDS
  • Home
  • About
  • Pr/Advertise
  • Contact
  • Shop
  • Store

Angry Birds

September 16, 2011 By: Freetimefrolics

Angry Birds bean bag toss DIY www.freetimefrolics.com

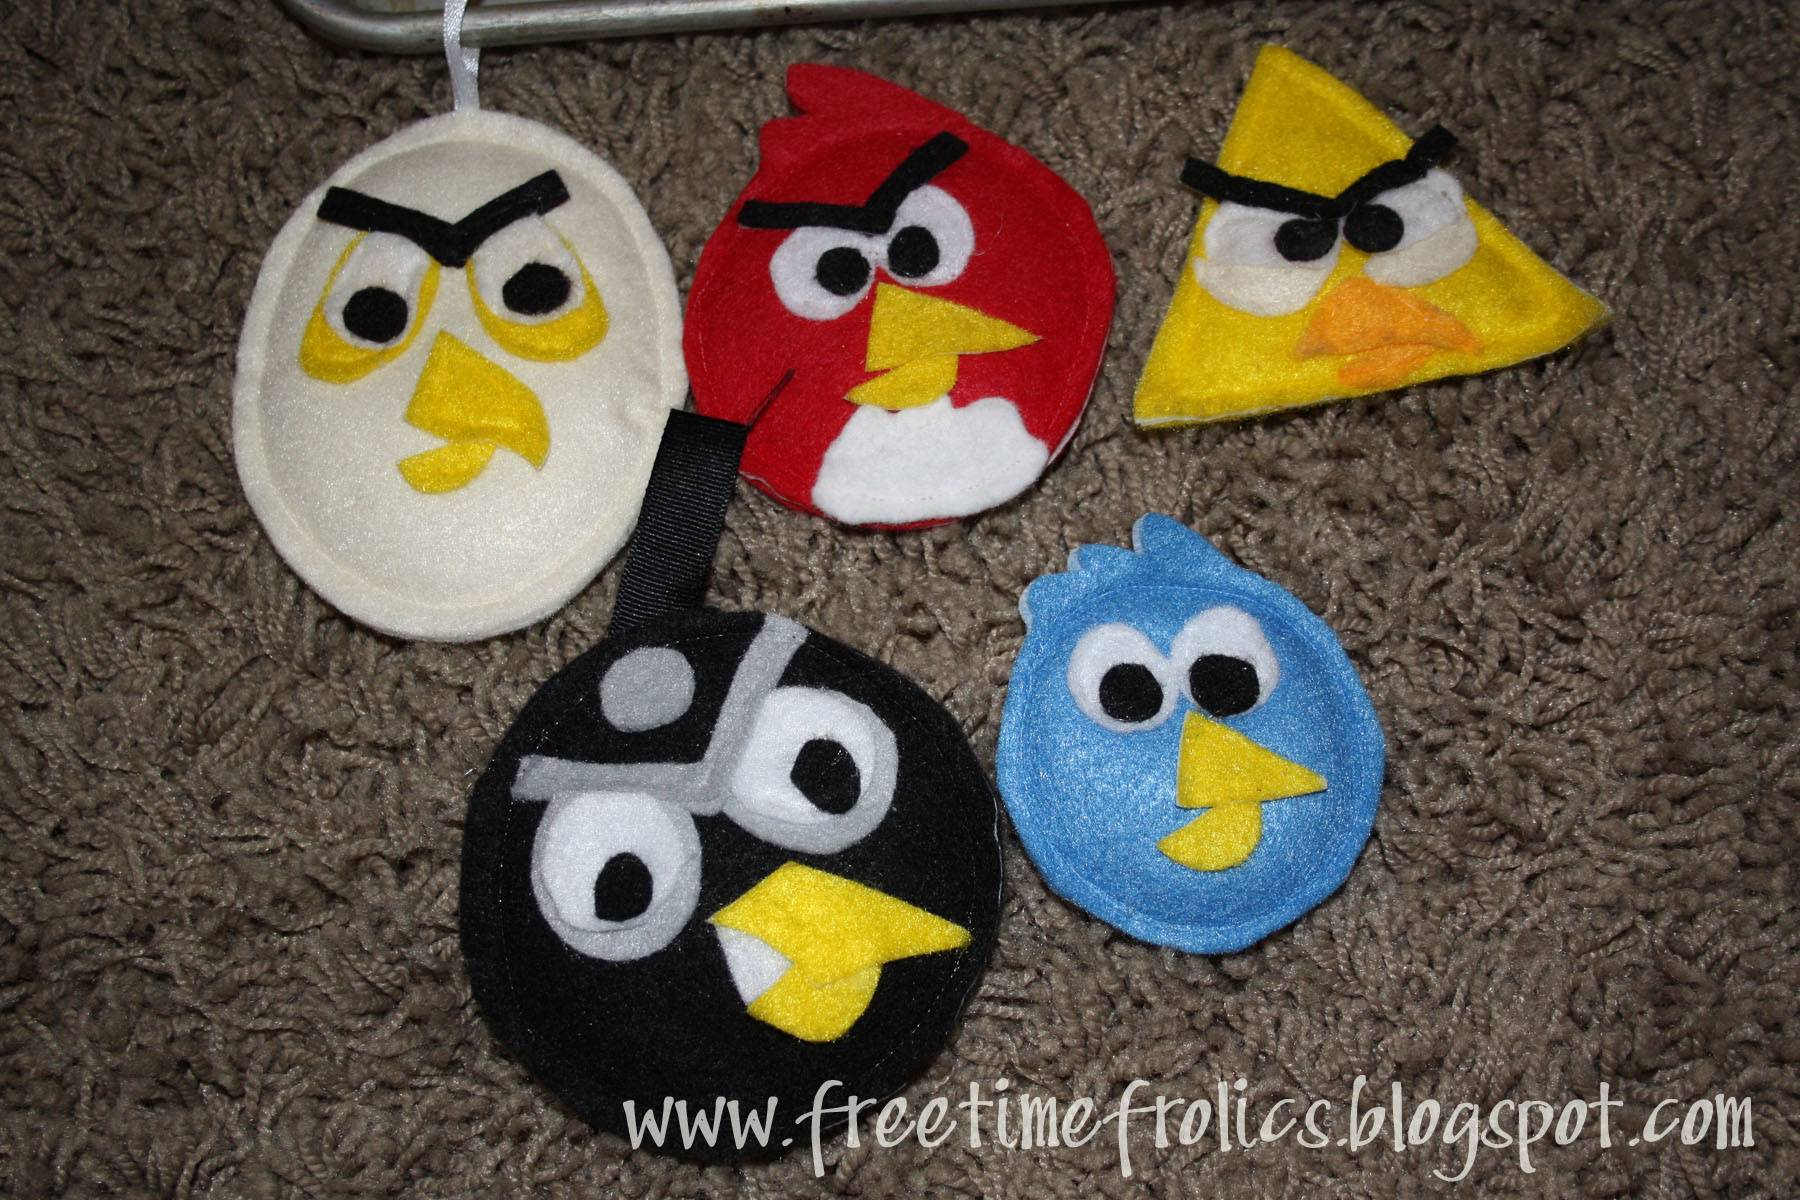
My boys love Angry Birds.  I thought I would make something fun for them for Christmas.  Then I was asked to do a local Bazaar.  I thought they would make a great gift for a cute little guy or gal.  So I decided to get a jump on it.  Here is my take on Angry birds the bean bag toss.

 Angry Birds bean bag toss DIY www.freetimefrolics.com
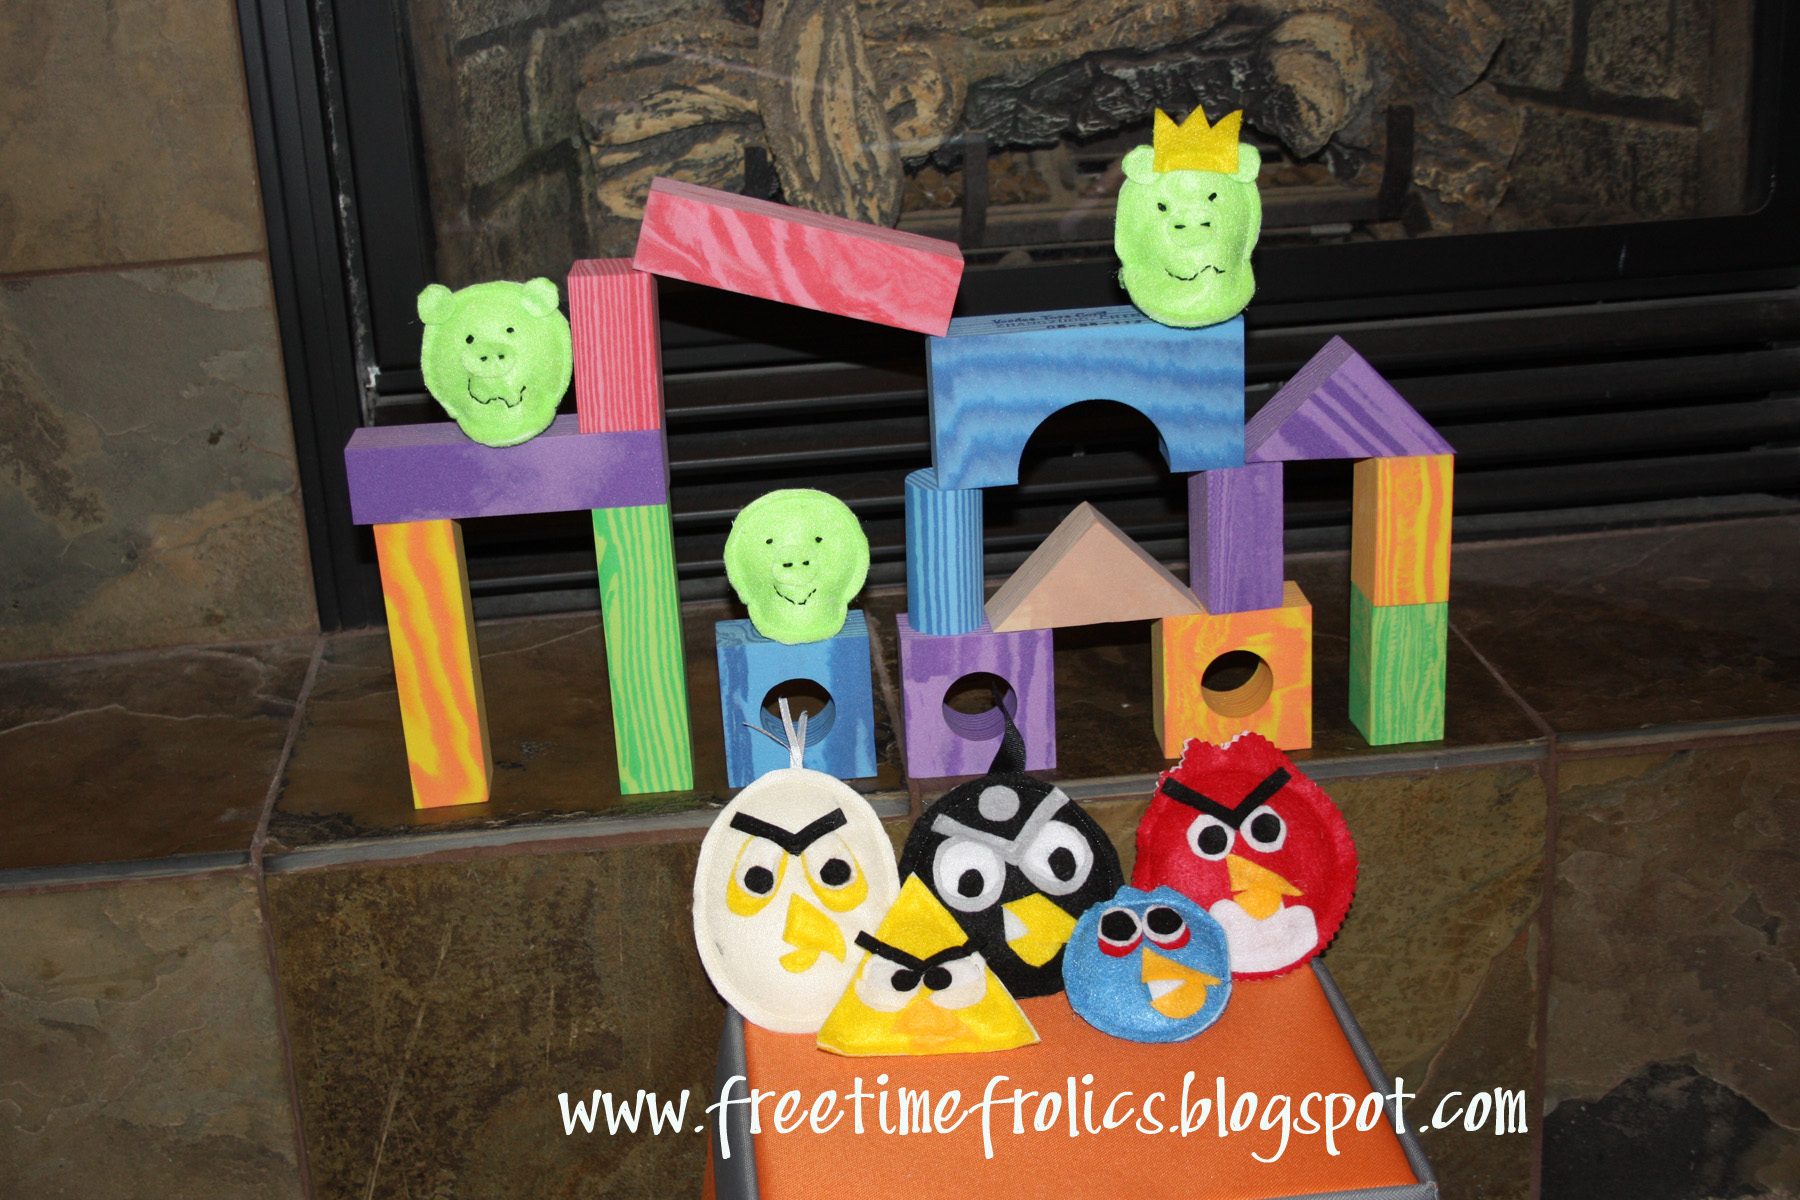
The birds are all 2 dimensional and the piggies are 3 dimensional.
Step 1: First I ironed Pellon to one side of the felt.
2: I cut the birdies from the templates below.  And stitched around the edges. Leaving a small hole for the poly fill pellets.
3: Then put them back through the machine to close them.
4: I then cut out the eyes, beaks and brows by hand.
5:Then glued eyes, beaks and brows with my trusty glue gun.
birds3
birds2
birds1
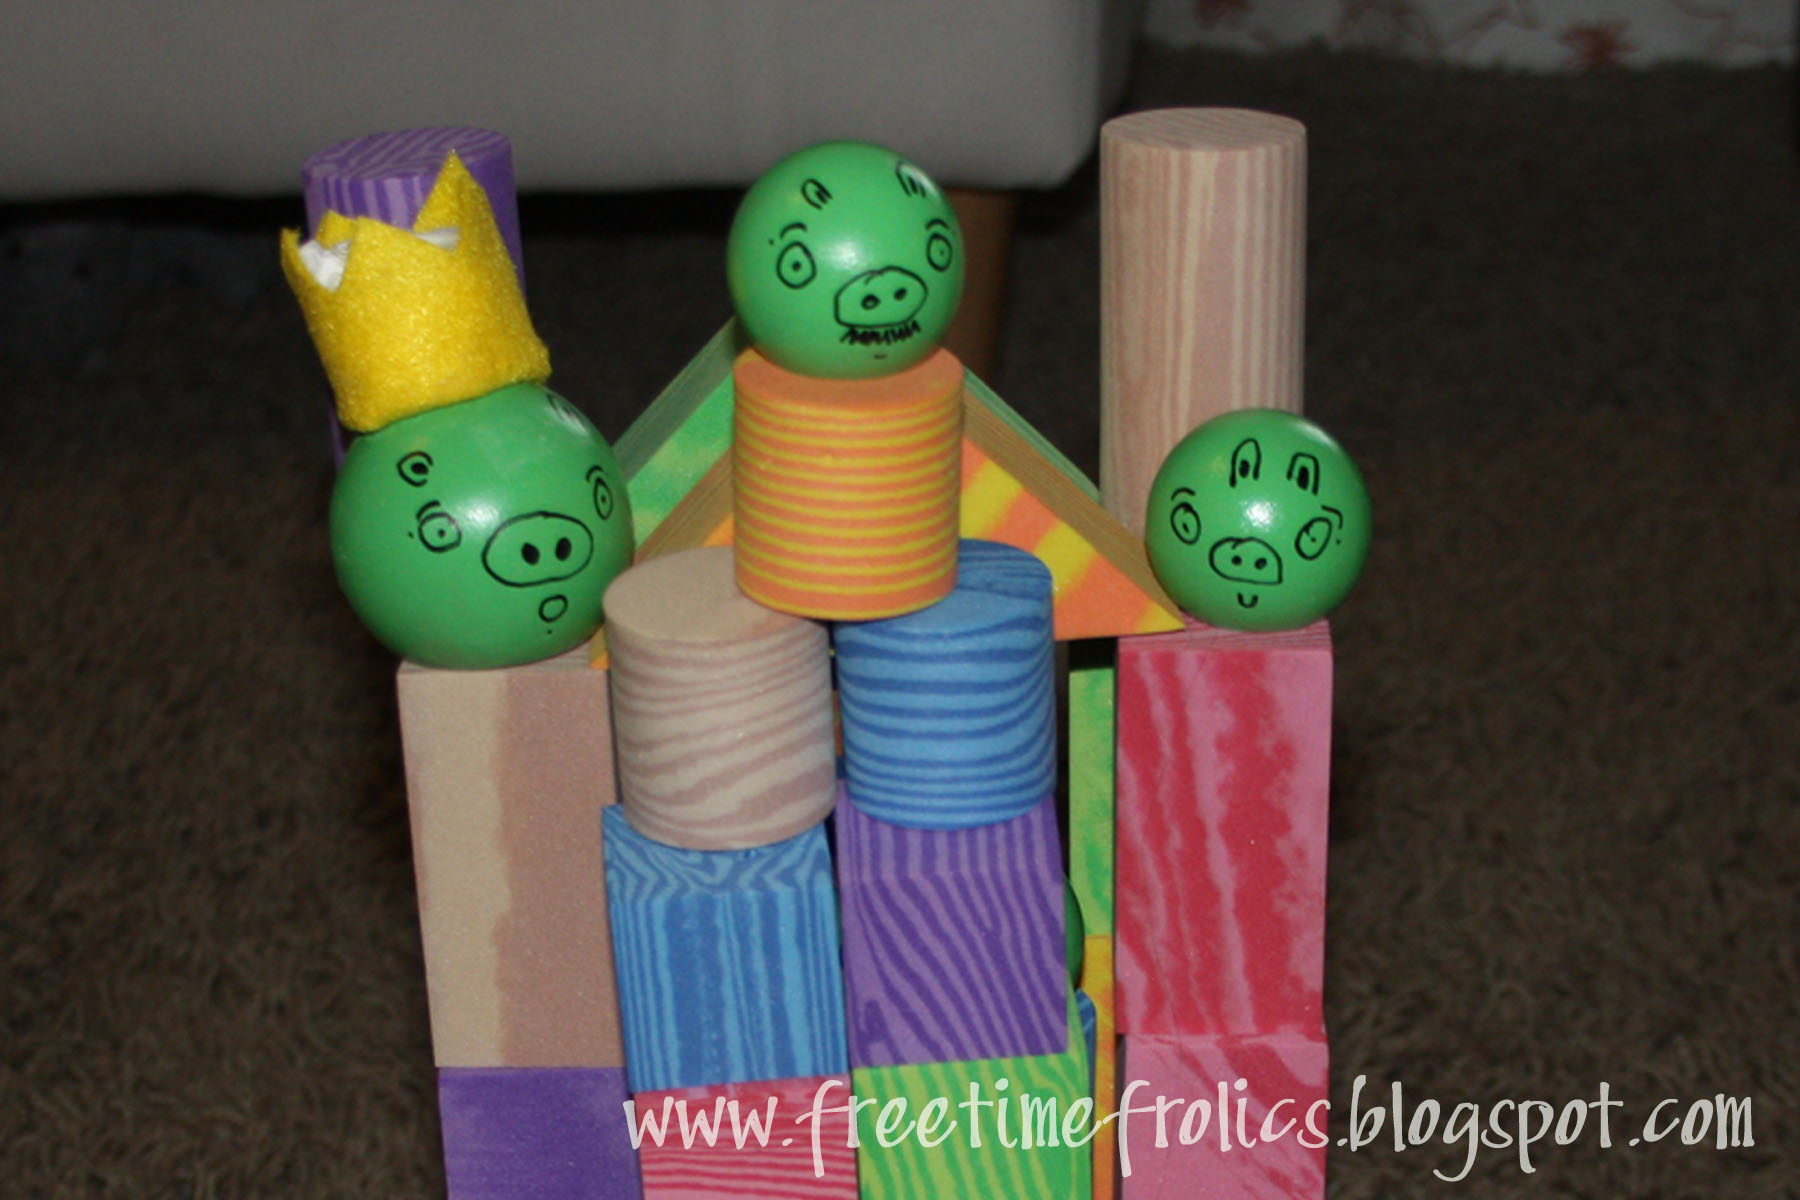
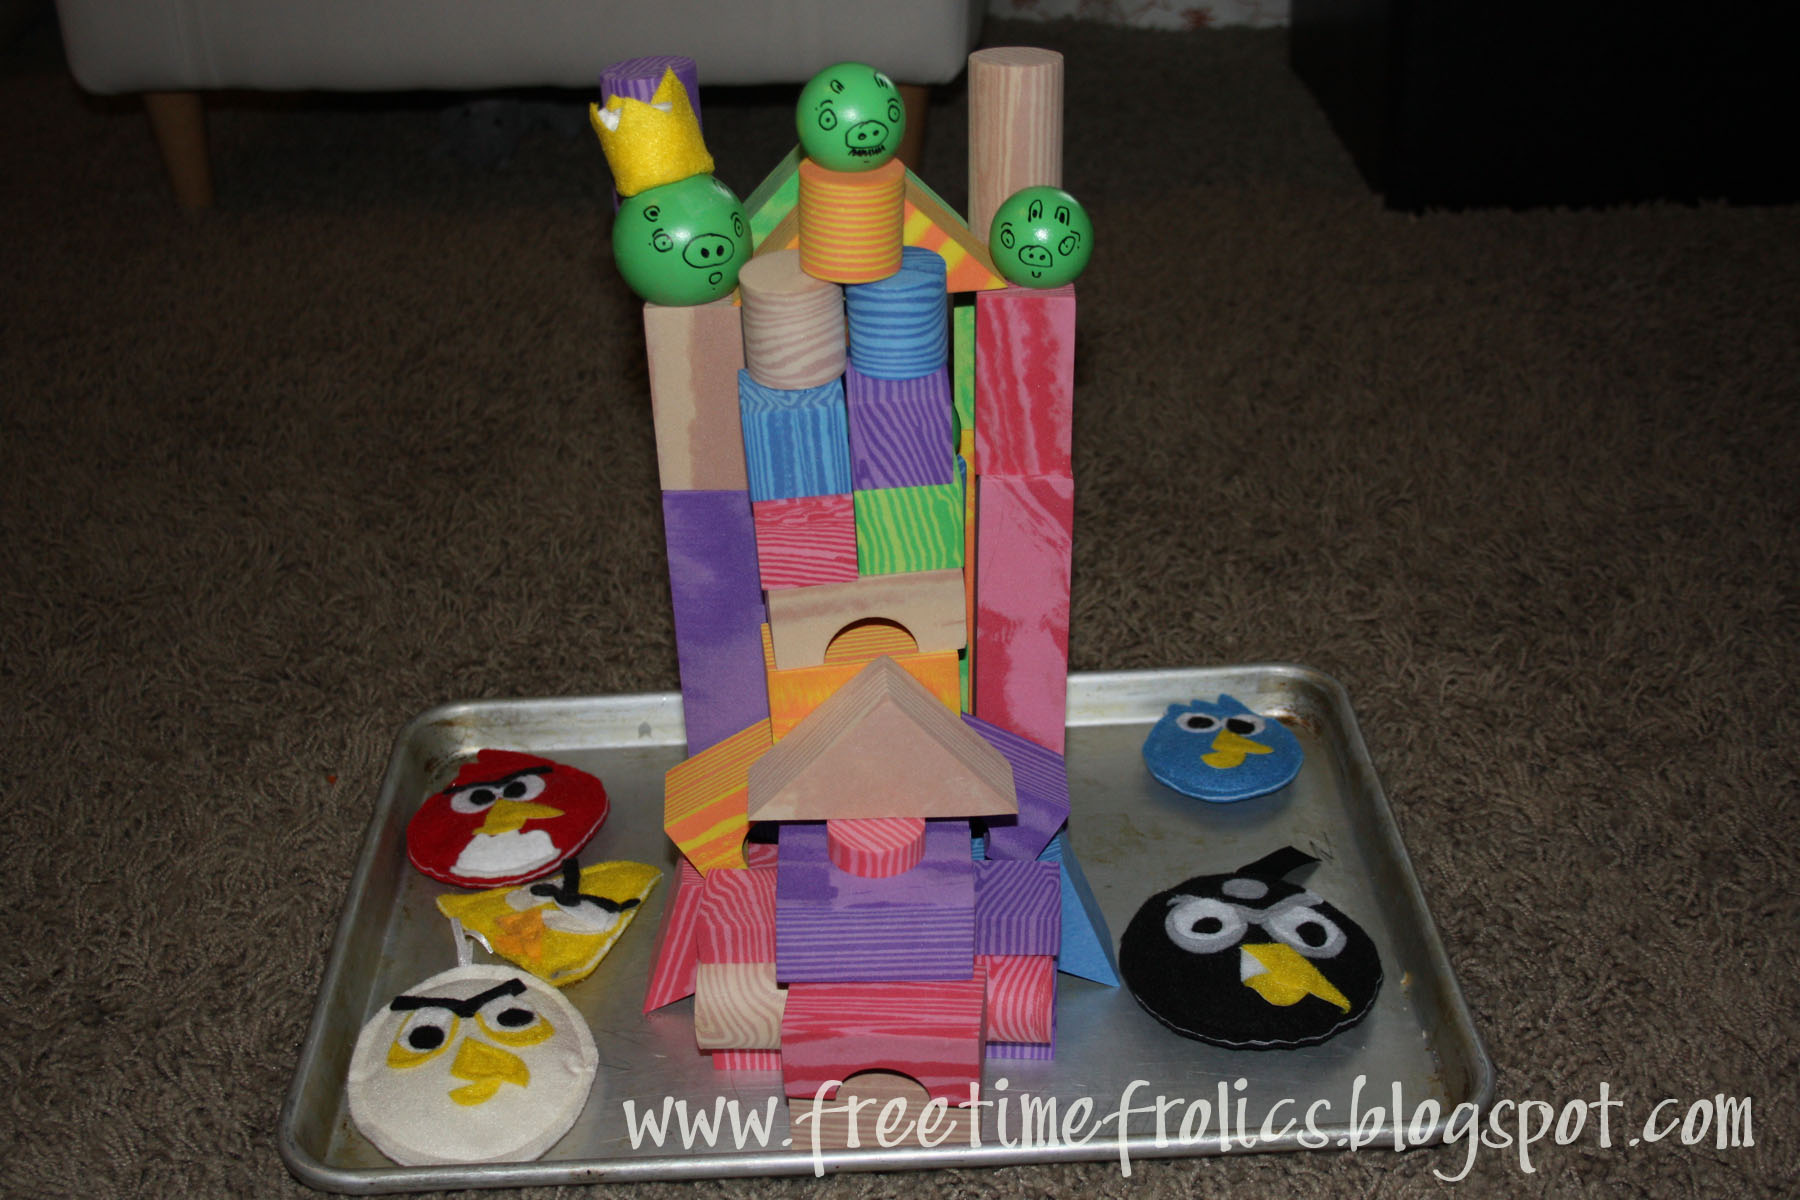
The piggies were a little more work.  I wanted them to be able to sit on the blocks.  I sewed 3 small circles together so that they would have a bottom gusset to sit on.  Then hand stitched the eyes, nose and mouth onto the fronts. I think next time I am going to make the piggies out of wooden doll heads. Paint them green and free hand the eyes and mouths.
Update for Piggies
Add a set of block and some special little guy or gal will be busy all afternoon building and tossing birds.
I thought this would be a great birthday or Christmas gift!
***Parental Warning***
This tutorial if made may cause your children to act peculiar.
Laughing, Giggling and using there Creativity may occur.  And may happen for long lengths of time.
Your TV, Video games and Computer will be grateful for the break.

Better than Water Balloons

September 13, 2011 By: Freetimefrolics

Better than Water Balloons
I found these on Pintrest and thought they were a fantastic idea.  They cost a little to get started but once they are made just add water and reuse as much as you want. 
Supplies needed:
Large sponges
Reuseable yet disposable wiping cloths
Mop with absorbant strips
Plastic cable ties
non slip cupboard liner

Cut your sponge, wiping cloth and liner into 1-1 1/2 in strips.
Cut strips off mop like above.

Next layer your strips.  I used 2 of each and made a little sandwich.
Wrap a cable tie around the center or your sandwich and pull tight. 
Clip the cable tie as short as possible.
You are ready for water fun.
Your kids will love these. 
I thought these woudl be fun to color code so you could play on teams. Give them each a bucket and some water balls and let them go at it.

Check out the entire post on my blog www.freetimefrolics.com

DIY Baby Leg Warmers

September 8, 2011 By: Freetimefrolics

Baby Legs DIY www.freetimefrolics.com
My new must have for my baby boy are legwarmers baby style. We we live in good old Idaho.  We have maybe 3 months of summer and 9 long months of winter.  But even in the summer the mornings are cool and the afternoons hot.  It’s hard dressing baby for the weather.  Some mornings this big guy needs a little extra.  I love baby legs but they are not always easy to find.  I have looked and can’t find a store.  So here is a little DIY for those on a budget, can’t find what you want or just plain old cheap.  I fall in to the all three category.
Baby Legwarmers sewing tutorial www.freetimefrolics.com
Start off with a pair of ladies knee socks. I got mine at Target for $2 each. Fall is the best time to find these. they may call them boot socks or knee socks.

Legwarmers Tutorial

 Knee High socks www.freetimefrolics.com
Next cut off your tags and unfold. You will next cut the socks just above the heel. Before the curve.
Then take the foot of the sock. cut the center section out. (The straight part of the foot.) Cutting off the toe and the heel.
When done you should have 4 pieces. You can now throw away the heel and toe.
baby legs diy
Next Take the short piece of the sock. (The part you cut form the foot) and fold in half. Take the folded piece and put it around the long piece with raw edges together.
Stitch with a long stitch around the raw edges.  Stitching all three layers together.  I like to stretch mine as I sew.  It gives them a little more stretch for Chubby legs.
 leg warmers 3
All finished.  Quick and easy.  My little guy has been sporting these this summer.  With crawling in the works I have one more reason to make a few more.
Another purpose I use these for is for my arms in my sewing room.  It is a little chilly in my basement for sewing.  I love to slide these on on cool day.  They keep my arms warm and I can slide them off when I go back up stairs.  The perfect accessory.
 leg warmers 4
Thanks for visiting!  Let me know what you think.
I love to read your comments

Back to School Printable

July 26, 2011 By: Freetimefrolics

Back to school subway art www.freetimefrolics.com #freeprintable #school

Do you love school time? I kind of have a love hate relationship with it. I enjoy having my kids home but I also enjoy sending them back to school.  I love sleeping in but I also love being on a schedule.

Here in Idaho we still have a few weeks till school starts.  But back home in Utah kiddos are heading back today,  Here is a cute little printable to get you back into the swing! Printable size is 11×14.  Just right click, save to your computer, then print at your favorite printer!  Have a Happy Day!

Back to School Subway Art

Back to school printable www. freetimefrolics.com
Please click on the download link and print anywhere.  This print prints as an 11 x 14
Back to school subway art 
PLEASE follow the following rules for Free Time Frolics printables:
  • I would love for you to become a follower of Free Time Frolics on Facebook. More Free Printables are coming. You don’t want to miss out.
  • Free Time Frolics printables are for PERSONAL USE only. You may not re-sell, re-distribute, or claim them as your own.
  • If posting on the internet, you MUST post a link back to the original post or this page.
  • Freebie printables are offered “as is” unless otherwise noted.
  • Pin, share, use in your home or as a gift. Enjoy.

Foam Swords

July 9, 2011 By: Freetimefrolics

My oldest son went to Scout camp a few weeks ago.  He came home with one of these, a Foam Sword.  Know growing up my brothers and i woudl go out to the wood shed at Grandpa house. Find a few pieces of wood and sit down at the work bench and make things.  Usually swords because they were the easiest to make.  Well times have changed.  Most of us don’t have  wood shed or work bench and most wouldn’t let there kids sit outside to make swords.  This is an easy solution.
Here is what you need:
Foam Swimming Noodle
Fabric Scraps
Cut your noodles in half.  I just used a knife.  They cut very easy.

Take your fabric scraps and cut them 5×8 inches.

Next you will cut a circle a bit smaller than your noodle.  I folded mine in half and cut the circles the same. Thread your noodle through the holes.

And there off.  My little miss loves these.  Hers of course is purple (pink wan not availble) My kiddos play with these for hours and no one gets hurt.  Fun for the playroom, tramp or outside. I think  they would be great for a Pirate birthday party. 
I Heart Naptime
Check out the entire post on my blog www.freetimefrolics.com

Silhouette Wall Hangings

July 6, 2011 By: Freetimefrolics

We purchased our new home a year ago. I am still trying to get my house put together.  Lots to do. My Silhoutte came to the rescue. I made these cute mixed media canvases.

 I first purchased 3 canvases.  Various sizes. Mine were all under $4 each.  I cut vinyl dandelions for one.  Stuck them on the white canvas and Sprayed the canvas yellow.  I pulled teh vinyl off and this was the result.  Next I used gunny sack fabric to cover the canvas.  I cut brown heat transfer material and cut out the branches, name and year.  I ironed them onand them stappled my fabric to the canvas.  It was super simple and turned out pretty cute.  My chevron board is fabric with fabric twisted flowers. All in all I spent maybe $15 for all three
Check out the entire post on my blog www.freetimefrolics.com

Nursing Tank Tops

July 3, 2011 By: Freetimefrolics

Nursing my babies has always been important to me. But clothing for a nursing mom  has never been fashionable. It is a need that needs to be filled.  Layering is a big thing these days and Nursing tanks are no exception.  I bought a tank top specifically for breastfeeding online and totally love it.  But it only came in 2 colors.  So the other day when Gal pal of mine called and said Down East was having a closeout sale on there clothing.  Nothing over $10.  So I stopped. They had cami’s 2 for $5.  So I picked up a few and made my own breastfeeding tanks in under 15 minutes and less than $10.


Nursing Tank Tutorial

1 Tank Top
1 set of swim suit/bra hooks
Nursing tank top sewing tutorial www.freetimefrolics.com
  Unpick the back straps and cut the front leaving about 11/2 inches of strap.


breastfeeding tank top tutorial www.freetimefrolics.com
Next thread your bra hooks through the straps.  Make sure the hook faces inside.
bra clip for nursing tank top www.freetiemfrolic.com
Next fold the strap to the wrong side of the tank and stitch strap.
diy nursing tank top tutorial www.freetimefrolics.com #breastfeeding
Your done. Now use the bra hook to slide it into the nursing cup.  This will be just below the clasp you unhook to nurse.
Now make one in every color you and two in your favorite colors.  I promise you won’t be disappointed.  These tanks are the perfect answer to breastfeeding.

Coconut Orange Cookies

July 2, 2011 By: Freetimefrolics

This yummy recipe comes from my way cool Granny!  She is the most amazing cook.  She has spoiled my family and makes it hard to have anything else.  I love trying to make her recipes.  This one was made for the blessing of our baby girl.  She made a huge platter and they were gone.  I was lucky to get the last one.  They have a more cakie taste to them.  I like them to because they give me the idea that they are on the healthier side!

[Read more…]

Princess Aprons

July 2, 2011 By: Freetimefrolics

So I saw these little cuties on a website the other day.  I thought they were totally cute and I am a sucker for princess stuff. I only have One little girl. I kind of give into anything girly.  Until I saw the price tag.  $25. Way to much for this mama to pay.  So I made my own. It only cost me about $8 and about an hour to make 2 of them.  So today you get Cinderella and Sleeping Beauty!

What you need for one:
1/2 – 3/4 yard fabric (color depends on the princess)
1/4-1/2 yard fabric for extras
Thread

 
 I cut my main fabric into sections. 13 inches for skirt, 5 inches for sash.  If I made this again I would buy and extra 5 inches to make my sash longer.

Next cut your extras. in this case the hip puffies ( not quite sure what to call them)
1.I started with cutting 4 rectangles 9 1/2 wide x 6 1/2 long.
Then I rounded 2 bottom edges.
Stitch around 3 sides. Clip rounded edges before turning.
Turn, Press and topstitch.
3. Gather the top.  I gathered mine to be 6 inches wide finished.

Next I folded my sash to have a finished edge.
1. Fold top left corner to right side lining up edges.
2. Fold top right corner to left edge. (You should have a triangle on the end of your sash)
3 Press.
4. Fold in half and press.
At this point I folded the straight edges of my sash  a 1/2 inch on both sides and pressed them to prepare for stitching everything together.
Okay so here I missed taking a picture.  But Its really simple.  I gave my skirt a little hem around 3 sides.  1 long (45 inches) and both short (13). About a 1/2 in.  I turned 1/2 inch and pressed then another 1/2 inch and pressed.
Across the non hemmed edge I did a basting stitch as large as I could to do my gathering. Leave you threads a little long for this.  Pull one thread and begin to gather you fabric.  When you have it the length you want tie the threads in a knot to hold it till you can stitch it. My skirts finished length after gathering was about 18 in.

I then added my puffies. Placing them each on center. Pin them into place.
Take your sash find your center and match it up with the skirt. Pin the wrong side of the skirt
to the right side of the sash.
Sew the sash puffies and skirt together.
Once done fold the sash over onto the skirt. Start at the end of the sash and stich to the other end.  As you stitch you will be finishing the sash and top stitching the sash to the skirt and puffies.

When your finished it will look like this! I added a fabric twisted rose to the center to give it a little more glam.  My little miss loves it!

I was thinking these would make a great birthday gift or party favor for a Princess and her guests!
 I think next time I may make a Belle, Tinker Bell or Alice in Wonderland apron.
Check out the entire post on my blog www.freetimefrolics.com

Homemade t-shirts

July 1, 2011 By: Freetimefrolics

Our new little guy is super chubby and tall.  He is so big he has almost outgrown most of his summer clothes and summer just started here in Idaho.  So I have had to improvise and get him some shirts.  In my creative quest to be a little more than boring I used my Silhouette again to make him a few shirts.
Here is my super baby.  I used heat transfer and fabric transfer to create this little shirt.  I designed the diamond and “S” in Silhouette program and cut it out. 

Little Mister Monocle
I love the mustache thing going on.  I used the mustache and monocle from Lettering Delights, Mustache Mania and Funny Faces.  I think my little guy may need a few more shirts.  What to do next????

Check out the entire post on my blog www.freetimefrolics.com
  • « Previous Page
  • 1
  • …
  • 45
  • 46
  • 47
  • 48
  • 49
  • Next Page »
  • Facebook
  • Google+
  • Instagram
  • LinkedIn
  • Pinterest
  • StumbleUpon
  • Twitter
  • YouTube

Shop my Moji LIfe

Shop my Plexus

SEARCH MY BLOG

INSTAGRAM @Freetimefrolics

MY RECENT PINS

Visit Adrienne {FreeTimeFrolics.com} Blogger's profile on Pinterest.

Categories

Archives

FOLLOW ME HERE

  • Facebook
  • Google+
  • Instagram
  • LinkedIn
  • Pinterest
  • StumbleUpon
  • Twitter
  • YouTube

Copyright © 2025 · Modern Blogger Pro Theme By, Pretty Darn Cute Design