Free Time Frolics

  • PRINTABLES
  • EAT
  • House
  • Make
  • Sewing
  • LDS
  • Home
  • About
  • Pr/Advertise
  • Contact
  • Shop
  • Store

Huggies Slip On diapers-Review & Giveaway

July 23, 2013 By: Freetimefrolics

“This post is part of a social shopper marketing insight campaign with Pollinate Media Group® and Huggies, but all my opinions are my own. #HuggiesSlipOn #pmedia http://cmp.ly/3/8vNxcO
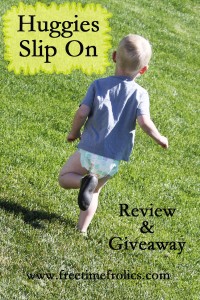
So a few weeks ago I was asked to test out and review the new Huggies Slip On‘s.  Of course I will!  I have a super Active 2.5 year old. He is like the Energizer Bunny.  He-never-stops-moving!  Finding a diaper that can move and shake as much as he does is tough.  I have always been a Huggies Mom. Nothing has ever worked better.  So trying out the new Slip On’s was a no brainer. 
I headed out to my local Target to shop for a box.  We live in a smaller city and our Target is super small.  I grabbed my box of diaper and forgot my coupon!  I decide to head home to grab my coupon (Check out this exclusive $2 off coupon!} only to have my box of Huggies Slip On’s sold out underneath me. {Bummer} So I had the wonderful Target employee check to see when there next shipment would be in.  I had to wait till Monday.  So we did our shopping and headed home.  A little sad we wouldn’t have our new diapers.  

When Monday came around we headed out to pick our box up.  Lucky for me we got the only box of size 5’s.  
My Little guy is getting close to being potty trained. (That will be a blessed day) I though these Huggies Slip On’s would be a great way to transition from diapers to Big boy Underpants.  I love that they slip on and off like underpants.  But have the option to treat them like a diaper with the side straps. 
The side elastic is soft on their and easy to use. They are made with lots of stretch for you little guy or gal to get there groove on.  With there amazing stretch I think I could buy a size smaller! 
 We had one leak during our test run.  I think I could have bought a size smaller. He is normally a 5 in diapers but these little lovelies are have plenty of room and I could have bought a size 4. I just adjusted the side elastic and no problems!  After that the leak protection was amazing!
I like how Huggies Slip On’s are slightly narrower through the middle for your little mover.  Less bulky.  Especially for kiddos who are constantly moving.  They curve in all the right places

 He calls them his big boy pants.  He loves being able to pull them off and on.  He has even used the potty a few times. {Yipee!!}

Whether my guy is Jumping, squatting, running or just hangin’ out, Huggies Slip On’s met the challenge. We will definitely be buying these little wonder pants again!

Before you head out to buy a box of your own be sure to print this coupon to save yourself a little cash! Huggies Coupon And enter to win a gift card to buy a box for your little guy or gal!
a Rafflecopter giveaway

Linking up! {Here}
Check out the entire post on my blog www.freetimefrolics.com

Lacing Boards {I Gotta Try That}

July 22, 2013 By: Freetimefrolics

dollar store laceing books diy www.freetimefrolics.com
Make your own fun and educational lacing boards for your kids!
These lacing cards will definitely keep little hands busy and entertained in the car, on a plane, at restaurants, church or even while mom’s trying to get dinner ready.
Lacing toy’s encourage dexterity, fine motor skills, coordination and attention to detail, all while enjoying every minute of it.
I purchased the supplies at the dollar store.
A cardboard puzzle, a foam puzzle and two books with 
the really thick pages.
I started with the Disney book and cut out the board pages.
This one book will give us six lacing cards.
The foam puzzle I left alone, but I took the cardboard puzzle 
and glued the pieces so it would’nt come apart.
Next I took a sharpie and put a dot everywhere 
I wanted a hole to be.
Then we drilled a hole on every dot!
I purchased a few bright colored shoe laces
from the dollar store to lace with.
You will need a long shoelace for each board.
 That’s it!
You can let the kids take it from here.
They will have countless hours of fun!

Christmas in July {Ginger Snap Crafts}

July 19, 2013 By: Freetimefrolics

Another great idea for Christmas this year from Ginger Snap Crafts.  She has made these adorable wood blocks.  Your kids can build what ever they want. I can’t wait to make them into a little town for my boys.  They can cruse their cars around town. Head over and check out her amazing tutorial and may a set of your own!
Easy DIY Blocks @ Ginger Snap Crafts

Linking up! {Here}
Check out the entire post on my blog www.freetimefrolics.com

Christmas in July {Creative Capital B}

July 18, 2013 By: Freetimefrolics

Do you have a little ninja?  Skye @ Creative Capital B is sharing handmade pool noodle nunchucks. Fun for all ages. My boys will flip when they see these. They are super easy to make.  So head on over and check out how to make yours.  And Whole your there check out a few of her other post.  She has a house full of boys and tutorials to go with them!
Nunchucks @ Creative Capital B

Linking up! {Here}
Check out the entire post on my blog www.freetimefrolics.com

Mr. or Mrs. Potato Head {Girl Loves Glam}

July 17, 2013 By: Freetimefrolics

Do your kids love Mr. Potato Head??  Mine do! So how about making one of your own to take in the car or use for quiet time!  Girl Loves Glam has you hooked up! Head over and checkout her post and maybe make your own Mr. Potato Head!
Diy Mr. or Mrs. Potato Head @ Girl Loves Glam

Linking up! {Here}
Check out the entire post on my blog www.freetimefrolics.com

Fishing Hole Roll {Made my Me. Shared with You}

July 16, 2013 By: Freetimefrolics

Do you have a little Fisher Man or Girl in your family?  This may be the perfect toy to make for them for Christmas,  Made by Me Shared with you has an awesome tutorial to follow to make this fun toy.
Head on over and make your own Fishing hole!
Fishing Hole Roll @ Made by Me Shared with you

Back to School Blast! Shopping List {Free Printable} + Giveaway

July 15, 2013 By: Freetimefrolics

back to school clothing buying lists www.freetimefrolics.com
Getting your family prepared to head back to school, can be difficult especially after a long, fun-filled summer. Here are a few of our favorite Back to School Tips to help you along the way.
1. Back-to-School Supplies Checklist – Backpack? Check. Pencils? Check. Safety scissors? Not Yet. Use the same checklist each time you head out to grab supplies, to keep track of what you have already purchased and the things you still need to. These are also handy if you have more than one child. Simply print 2, 3, 4 list and add their name to the top.

[Read more…]

Nautical Bracelets + Life’s a Beach Round Up

July 12, 2013 By: Freetimefrolics

July’s Blog Hop
Life’s a Beach!
8 Blogs 8 Awesome “Beachy” Ideas
 I love this time of year the weather’s warm and the kids are out of school and for a few months the world seems to slow down a bit…And so with that being said we figured since all of us are land locked and dreaming of being at the beach; we’d  use our crafty skillz to bring a little beach ambiance to our landlocked homes and lives. So if you too are wishing and dreaming of being at the beach, but can’t join our club and enjoy our “Beachy” best!  Better yet pull up a seat, but your feet in a kiddie pool and grab an ice cold drink of your personal preference and cool off with these refreshing ideas.
8 Blogs 8 Awesome "Beachy" ideas that will rock your world!!!


Stop by and visit all my AMAZING Bloggy friends and check out how the Beach has inspired them!!
1. Emily of The Benson Street
2. Adrienne of Free Time Frolics
3. Ashley of Flats to Flip Flops
4. Rebecca of The Crafted Sparrow
5. Andie of Maybe I Will
6. Melissa of Hollyhocks & Honeybees
7. Candice of She’s Crafty
8. Kaylnn of Among the Young

Isn’t that round up amazing.  These are some talented bloggers!
So to get started with my tutorial for Nautical Bracelets. These are super simple and quick to make.
  For the navy square knot bracelet you will need about 18 inches of cotton rope.
Now you have 2 loops with bracelets finding on each end. Lay your loops on top of each other with the ends away from each other. Pull the Charm ends through the loops opposite of each other.
Pull knot tight and you are ready to go.
 For the anchor bracelet I started with 1 yard of rope I found in the trim section at Joanns. I also got an anchor and 3 silver beads with a large center opening.
Cut your rope in half. Fold one section in half and loop through the charm.  Then loop the ends through the center hole.  Do the same for the bottom of the anchor.
Next put ends of the rope through one bead.  one set going through one end and the others through the other side. Add a bead to each end and tie a knot at each end.
The center bead keeps your bracelet tight on your wrist.
Linking up! {Here}
Check out the entire post on my blog www.freetimefrolics.com

No sew Capes { Rachel from R&R Workshop}

July 11, 2013 By: Freetimefrolics

Hi, Free Time Frolic readers!  I’m Rachel from R & R Workshop and I’m excited to be here today! I’ve been wanting to make my son a cape for a couple years now. I bought some awesome superhero fabric recently and then realized his sister would probably love a cape as well. These were so simple and No-Sew! A super, easy project and it took no time at all. A Perfect gift idea for birthdays or Christmas!

You will need: 

//fabric: I used felt on one side, 
cotton on the other.
//glue gun
//scissors
//velcro
//ribbon
//pompoms or anything you want to use
to embellish the cape.
Steps:

Step 1. Measure your child to know how long and wide you need the cape to be. Cut out both fabric pieces.
I didnt mind having my edges a little frayed on my fabric, but you can sew yours if you choose to.

Step 2. Place ribbon in-between the fabric, at the top of the cape.. Glue in place.

Step 3. Glue pieces together. I started at the top and went across like pictured above. Smooth down as you go so fabric will not bunch. I did a row at a time and then went back around the edges to make sure they were glued in place.

Step 4. Determine how long you need your ribbon and then glue your velcro onto the ends of your ribbon. I didn’t get a picture doing this, but I’m sure you get the idea 🙂 I chose velcro instead of tying around there neck since its a little safer.

5. Decorate the cape if you choose.  For E’s, I didn’t add anything to decorate since the fabric is so busy. For A’s, I added pompoms on the top and at the bottom.  I bought them by the yard for a dollar or so. I loved the fun they add to her cape!

They both really loved them and played together all morning 🙂
For more fun ideas, you can follow R & R Workshop via Facebook, Twitter or Pinterest!
Thanks Rachel!  These are adorable and no sew!  I love them.  Head over to check out all the great ideas Rachel has waiting for you to find!

Linking up! {Here}
Check out the entire post on my blog www.freetimefrolics.com
  • « Previous Page
  • 1
  • …
  • 23
  • 24
  • 25
  • 26
  • 27
  • …
  • 49
  • Next Page »
  • Facebook
  • Google+
  • Instagram
  • LinkedIn
  • Pinterest
  • StumbleUpon
  • Twitter
  • YouTube

Shop my Moji LIfe

Shop my Plexus

SEARCH MY BLOG

INSTAGRAM @Freetimefrolics

MY RECENT PINS

Visit Adrienne {FreeTimeFrolics.com} Blogger's profile on Pinterest.

Categories

Archives

FOLLOW ME HERE

  • Facebook
  • Google+
  • Instagram
  • LinkedIn
  • Pinterest
  • StumbleUpon
  • Twitter
  • YouTube

Copyright © 2026 · Modern Blogger Pro Theme By, Pretty Darn Cute Design