Free Time Frolics

  • PRINTABLES
  • EAT
  • House
  • Make
  • Sewing
  • LDS
  • Home
  • About
  • Pr/Advertise
  • Contact
  • Shop
  • Store

Princess Bead Necklaces {Steph from Crafting in the Rain}

July 10, 2013 By: Freetimefrolics

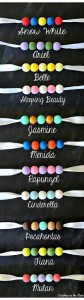
Today’s link is a favorite of mine. Stephanie or at Crafting in the Rain had this amazing idea to make simple but adorable princess necklaces from beads and paint. Genius! Head over and check out how simple and easy this tutorial is.  Your Little Princess will love these necklaces Christmas morning!
Princess Neclaces @ Crafting in the Rain

Linking up! {Here}
Check out the entire post on my blog www.freetimefrolics.com

Goldfish Cheese Puffs {Snack Mix}

July 8, 2013 By: Freetimefrolics

Goldfish puffs trail mix www.freetimefrolics.com
With summer in full swing, my sons has a few camping trips coming up.  I saw these new Goldfish Puffs at Target and decided to give them a try.  My Son is just about to turn 12, so regular goldfish are good but he is getting older and his taste are changing.  These new Goldfish puffs are right up a teenagers alley.  I decided to turn these Yummy Goldfish Puffs into a fantastic trail mix for all the boys to eat around the campfire.
Goldfish Puffs

With teenage years upon us I though it would be fun to try some fun new flavors for these boys to try.  Pepperidge Farms Goldfish crackers are a family staple in our house.  My kids love them.  I was anxious to try the new Goldfish Puffs! My boys will soon be teenagers. So I love finding new products to suit there taste buds and big appetite is key.  Goldfish Puffs come in 3 great flavors. Mega Cheese, Bacon Cheese and Buffalo Wing. The fish are larger than the crackers we were use too and so was the bag. I love that they were teenager friendly, we were excited to try them!

My local Target is small and only had one flavor. {Bummer} It’s the only one Target for about 100 miles.  I can’t wait to try the others when we can get to a larger one. I found these yummy treats in the cracker aisle in Target. Right next to the Pepperidge Farms goldfish crackers. So I grabbed what my Target had and picked out the rest of my snack mix ingredients

Since I was trying to please a few soon to be teenagers, I decided to try making a smokey Bacon flavor trail mix. Once I had it made I sat it out for the kids to try. Most of them loved it.  The older the kid the more they liked it.  So here is what you need to pick up!

Goldfish Cheese Puff mix

Goldfish Puffs Mega Cheese Flavor- Only at Target
Smoke house Almonds- small can
Pepperidge Farms Pretzel Goldfish
Bacon Flavored Popcorn
I started by popping my popcorn.  Mix all the ingredients together in a large bowl and enjoy.  I placed a large batch in a gallon ziploc bag and sent it with my son on his camp out.  I wish I had pictures, but the boys and leaders ate it gone.  Nothing came home!  They Loved it!  The Cheese Puffs are giant sized goldfish with  big crunch.  Perfect snack for your teenager, a road trip,or movie night treat!
goldfish cheese puffs snack mix www.freetimefrolics.com #treats #mix #salty
Goldfish Puffs Snack Mix
Goldfish Puffs-Mega Cheese Flavor
Since we didn’t get to try the other flavors they are on the top of our list the next time we are in a larger Target.  My kids loved trying these out and they will stay on our shopping list for snacks on our home !
For mor on my shopping experience at Target check out these great insights.{Target Shopping}
For more information about Goldfish Puffs Check out these links:
Goldfish Twitter:
Goldfish Facebook

Cherry Limeade Concentrate {Recipe}

July 3, 2013 By: Freetimefrolics

canned cherry limeade www.freetimefrolics.com


So after posting about my Strawberry Lemonade Concentrate I decide it was time to try my hand at Cherry Limeade.  I loved cherry limeade as a kid and I love myself a good Lime Rickie.  So I bought a lot of Cherries and Lime Juice and busted out a few bottles!
Cherry Limeade concentrate recipe www.freetimefrolics.com
Can you see all that yummy pulp?  It’s the best part for me!
Want to make a yummy batch for yourself?  Check out how I made mine!

 Cherry Limeade Concentrate Recipe

This recipe makes approximately 3, 2 quart jars
Take:
5c. Lime Juice
6c. Sugar
4 c. Cherry Juice
Start by juicing your Cherries.  I use a steam canner to juice mine (Check out this post for canning supplies I love) Steam as much juice as you can.  I can steam about 4 pounds of cherries to get 3 cups of juice. If you like pulp, like I do, take your steamed cherries and place them in a strainer. Mash them with a potato masher and add the pulp to your mixture.
In a large pot mix sugar and lime juice. Heat on medium heat. Pour into pot and heat.  Using a candy thermometer heat the mixture to 190*.  While limeade is heating be sure to clean bottling jars and heat lids and fill water bath with water.
Pour Limeade concentrate into jars, filling to the bottom of the jar rim. Place your jar lid on top and place your jar in your water bath.
Once jars are in water bath be sure water is about 1 inch above the jars.  Boil jars for 15 minutes.  Remove from water bath.  Place on a dry upside down to help seal.
Cherry Limeade concentrate recipe www.freetimefrolics.com #foodstorage
Your Limeade concentrate is ready to drink!  Mix together 1 jar concentrate, and 2 jars of water.   If you like yours sweeter just add 1 jar of water or mix yours with a little sprite or 7up. I love mine on the thin side. 
Food storage friendly Cherry Limeade www.freetimefrolics.com
This yummy treat is perfect for a holiday, BBQ or just because.  Everyone loves it! I hope you do too.  For more information about canning, check out this post! Enjoy

DIY Woven Bracelets

June 28, 2013 By: Freetimefrolics

I was taking a leisurely walk around Joanns a few weeks ago and discovered they had this amazing braided trim on the mini bolts in the trim section.  I loved the color and searched for a few more.  They were the perfect colors for a spring bracelet.  Add a little of this and a little of that and voile you have some funky bright colored bracelets for summer! Check out how I did them.

You need:

braided trim 1/4 yard should work on most wrists
leather laces: you can buy a small spool or in the leather jewelry section you can get smaller pieces
beads or charms if you like
glue gun
Measure your wrist.  Depending on which one you make will determine how big to cut.  I used a small amount of glue to the ends of the cut trim to ensure it didn’t fray or come unraveled.
For the blue bracelet I cut mine 6 inches.  I glued the ends to keep them from fraying.  I wrapped each end with leather and made a tie.  I added 2 silver rings for a little something different.

For these ones I glued them end to end and wrapped leather around them to cover the glue.  These measure approximately 9 inches.  Perfect for sliding on your wrist.

For this one I glued it end to end.  I wrapped it in leather.  Then I added some wrapped wire and beads for something a little different.

I love the color combinations I can make with these 5 colors.  What are your favorites for the summer??

Linking up! {Here}
The DIY DreamerThe 36th Avenue
Check out the entire post on my blog www.freetimefrolics.com

Creamy Chicken & Pasta {Recipe}

June 26, 2013 By: Freetimefrolics

 
I love a quick, easy meal that I can throw together for dinner.  Even better when I pull it our of the freezer and bake.  I love making Cheesy Chicken & Pasta for my family and adding a fresh veggie and french bread or biscuit. This recipe can be made the same day or doubled and half placed in the freezer for later! Here is how I made it.   

3 Cups Pasta, any shape
1 can cream of chicken soup
1 12 oz can evaporated milk
1/3 cup Parmesan cheese
1 cup Mozzarella cheese
2/3 cup fried onions
3 cups cooked chicken (diced or grilled works best.)

Cook pasta for half the time recommended.  Combine soup, milk, cheeses. Add onions, chicken and pasta. If pasta is hot it will melt the cheese. Place in a baking dish and bake, covered,  for 45 minutes at 350*.  Remove foil last 10 minutes and top with a few fried onions.

This recipe usually makes a lot. For my family I make a full batch and Freeze half of it in a gallon freezer bag before baking.   If you do freeze, to reheat remove from freezer and defrost. Place in baking pan and bake at above temp and time. Bake slightly longer if still frozen.
We love to have ours with a veggie and french bread.

Pin It
Check out the entire post on my blog www.freetimefrolics.com

Easy DIY Knit Headband

June 24, 2013 By: Freetimefrolics

easy diy headband www.freetimefrolics.com

 I was at Joann’s the other day.  There were 2 teenage girls buying knit fabric.  I asked them what they were going to make.  They showed me a headband they had purchased and figured they could make them.  So I took a look at the headband, gave them a few sewing tips and off they went to make their headbands.  I started thinking and decided to make a few of my own. These headband are super simple.  And stylish too.  I have even teamed up with Ashley over at Flats to Flip Flops to show you how to fashion your head band.

Start with 5×45 inches of knit fabric.   I like mine to be a bit thicker with a double knit.
Fold the width of your knit with right sides together. Stitch up the length of  knit. Making a long tube.
Turn your tube right sides out.
If you are making this for yourself lay the tube around your neck with the end hanging in front. Take the long ties and pull the tube up around the neck.  Take your ties and cross the ties around each other. Bring the ends to the back center of the neck and Pin your ends.  Stitch the ends together then stitch it to your first layer.
If you are making it for someone else. Measure your tube.  For an adult I cut my tube to 40 inches.
 Make a circle and cross your ends.
Cross them back a gain and bring your ends back down.
Pin into place. Stitch your ends together then stitch your seem to the the first piece.
Finish your headband by stitching your two layers together. Make 2 stitch lines on the seam with the seam on the inside.
Your headband is all done.  Need ideas to fashion your headband??  Check out Flats to Flip Flops! My gal pal Ashley is giving a few fashion tips on wearing headbands.

Easy Homemade Honey Butter {Recipe}

June 21, 2013 By: Freetimefrolics

honey butter recipe www.freetimefrolics.com
So a while back I made these Homemade Fried Scones with Honey-Butter.  Probably the best recipe I have ever found for Utah Scones.  As a child we had these at lest once a month. We use to make them from frozen bread dough.  Fast forward to now and I make my own dough and honey butter. Check out the recipe below and tell me what you think after you spread your homemade honey butter on a thick piece of homemade wheat bread or hot fresh scones.
Honey butter recipe for scones and bread www.freetimefrolics.com

Homemade Honey-Butter Recipe

1/2 C Butter- room temperature or slightly cooler
1/3 C. Honey
1 T. Powdered Sugar
Whip ingredients together. To thicken up you may want to refrigerate for 10 minutes.
Serve!
utah scones and honey-butter recipe www.freetimefrolics.com
Need a few recipes to use your Honey Butter with???  Check out these posts!
wheat bread recipe link www.freetimefrolics.com
Whole Wheat Bread
Fried Utah scones recipe link www.freetimefrolics.com
Fried Scones
Do you have a food item that you love to eat with Honey butter?  Please share!

What to wear!! {Fourth of July} 15+ Diy Clothing Projects

June 19, 2013 By: Freetimefrolics

The 4th of July is one of those holiday I just love dressing up for.  I realize that it is only 1 day, but I grew up being taught that it is important to celebrate our freedoms.  I have heard stories about family members who have fought in past wars.  Hearing there stories reminds me that freedom is not free.  It is earned and should be appreciated. So every year I rack my brain to find something unique to dress my kids in. So this year I made a round up of projects that I love. Some are DIY some are purchase but all are fabulous.   All around dressing You and your kids for the 4th of July!! 


I will start off with Patriotic flip flops!  What kids wouldn’t love these  Easy to make and fun to wear!!
Bandana Flip Flops @Itsy Bitsy Paper
I love this headband.. I made this one with the tutorial from Raegun Ramblings!. A great way to add color with an up do for the red hot holiday!
Scrappy Headband Tutorial @ Rae Gun Ramblings
Don’t sew or have a vinyl cutter?  I have you covered. This T-shirt took me 30 minutes from start to finish.  Make yourself one in no time!
Easy Flag shirt @ Free Time Frolics
patriotic tshirt makeover
Patriotic t-shirt @Love and Laundry
Patriotic Pinwheels {Hair clip or Brooch} @ Free Time Frolics
Ric Rac flag shirt @ Our Good Life
Fourth of July Outfit
Bubble top and Knickers Pattern @ Cosette’s Closet
Hand print flag shirt @ Crafty Erin
Fire Cracker Tees @Free Time Frolics
Ruffle Flag shirt @ Make it Love it
Hand painted Tees @The Family Scientista
Fourth of July Uncle Sam Outfit
4th of July Threads- Skirt and Tuxedo shirt
4th of July Tiara @ Our Everyday Art
 
Bandana Dress @Fabulously Frugal 
4th of July Tutu @R&R Workshop
Ruffle Sleeve Onesie @ Girl Loves Glam

Linking up! {Here}

Easy American Flag T- Shirt

June 17, 2013 By: Freetimefrolics

Easy Flag T- Shirt DIY www.freetimefrolics.com

Sugar Bee Crafts Red White Blue
I am so excited to be a part of Sugar Bee Crafts Red White and Blue Series.  Today I am sharing my Easy American Flag T-Shirt. No sew, not cutter required!!
I love dressing my kids in Patriotic clothing and outfits for the 4th of July.  I think it is important to instill in our kids how important our freedom is, and to appreciate those how fight for our freedoms. So every year I try to think of something easy and special for each one of them.  This year I went the easy route and made these fun and easy American Flag Tees!!

To start you will need:
A pre washed t- shirt
red and blue iron on vinyl {I buy mine at Expressions Vinyl}
Start pattern: I just found one online and cut it out
Paper Cutter
scissors or exact o knife
Start by deciding how big you want your flag to be. I cut 7 red strips 1/4 inch wide with mypaper cutter. My strips are 6 inches by 1/4 inch.   4 of my strips I cut 2 inches off the ends for the shorter strips on the flag.  Lay them out the way you want them.

Cut your Blue square to fit on your star spot. Mine was 2 x 2 inches.  I traces a star onto the top of the iron on transfer.
Cut your star out with an exact o knife or the tip of your scissors. Lay your star in place.
Once you have your Iron on transfer in place.  Cover your vinyl with a thin towel.  I like to use a flour sack towel. Press your vinyl with with medium to high heat.  Start with one side and work your way over. I like to hold mine in each section for 10-20 seconds then move on.  If your iron is to hot your vinyl will begin to wrinkle.
You can tell if your vinyl is done by removing the clear plastic coating.  If it comes off fine all done. If not go over with iron again until set.  Once you have removed your clear coating.  cover with cloth again and go over it once more.  You are all finished.
For more Patriotic clothing idea check out these posts!
Patriotic PinWheels
Uncle Sam Outfit
4th of July Tees

Cinnamon Waffle Bites

June 10, 2013 By: Freetimefrolics

easy cinnamon waffle bites www.freetimefrolics.com
***Warning if you don’t like easy things, skip this post.  It can’t get any easier than this!***
So the other day I was cleaning out my fridge. Oh I dislike this job.  It reminds me of  the leftovers I forgot about. I really hate wasting food!  I found some packaged cinnamon rolls, tucked way in the bask.  I am not sure how they got in there.  I guess I bought them but I can’t remember when or were. They were really close to expiring. I debated on throwing them away. But then I thought, why waste them.  So I did something a little unconventional.  I threw them in the waffle iron!

[Read more…]

  • « Previous Page
  • 1
  • …
  • 24
  • 25
  • 26
  • 27
  • 28
  • …
  • 49
  • Next Page »
  • Facebook
  • Google+
  • Instagram
  • LinkedIn
  • Pinterest
  • StumbleUpon
  • Twitter
  • YouTube

Shop my Moji LIfe

Shop my Plexus

SEARCH MY BLOG

INSTAGRAM @Freetimefrolics

MY RECENT PINS

Visit Adrienne {FreeTimeFrolics.com} Blogger's profile on Pinterest.

Categories

Archives

FOLLOW ME HERE

  • Facebook
  • Google+
  • Instagram
  • LinkedIn
  • Pinterest
  • StumbleUpon
  • Twitter
  • YouTube

Copyright © 2026 · Modern Blogger Pro Theme By, Pretty Darn Cute Design