Free Time Frolics

  • PRINTABLES
  • EAT
  • House
  • Make
  • Sewing
  • LDS
  • Home
  • About
  • Pr/Advertise
  • Contact
  • Shop
  • Store

Chicken BLT Salad + Kraft Fresh Take = Delicious!

April 15, 2013 By: Freetimefrolics

chiclen BLT salas www.freetimefrolics.com
Recently I had the opportunity to try the new Kraft Fresh Take.  Have you seen those in the store? You can find them in the bagged cheese section of your local Walmart. Kraft Fresh Take are Cheese and flavored bread crumbs to make any dish just that much better.  I had seen them and wondered how they tasted.  With lots of flavors to choose from I took the plunge and bought a few to try. With salad season coming I needed a few new ideas.  I came up with a few old salads made new.
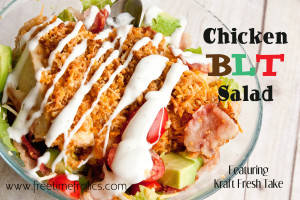
My first recipe is a Chicken BLT Salad
 I started with:
Chicken
Kraft Fresh Takes- Cheddar, Jack & Bacon Flavor
Plain yogurt
Lettuce
Tomatoes
Bacon bits
avocado
Kraft Ranch Dressing
Chicken BLT salad ingredients
First thing, I removed a bit of cheese and bread crumbs from the bag and set them aside for garnishing.
Mix your cheese and bread crumbs together.  Dip chicken in yogurt them roll in bread crumbs.
{Tip!} Using yogurt to help bread chicken keeps the chicken moist and juicy.  Try it the next time you need to bread and bake chicken!
Use yogurt to add moisture to any breaded meat
Next bake your chicken. I baked mine for about 30 minutes at 350* (This may take longer if your chicken is very thick.  Be sure to check before serving!)
As your chicken bakes put together the rest of your salad.  Chop your lettuce. Cut tomatoes in half or not. slice up your avocado and crumble your cooked bacon.
Once your chicken is done.  Slice it and add it to the top of your salad.  Garnish with the bread crumbs and cheese your put aside and Ranch Dressing.
Chicken BLT Salad
Cheddar, Jack & Bacon Fresh Takes = Amazing salad
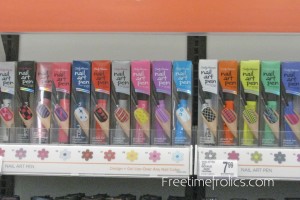
I love the flavors  Fresh Take have.  To find mine I had to shop at 2 different Walmart’s.  These little beauties are pretty popular. I suggest going out to get yours.  I bought several of the flavors to try. Stay tuned for a later post on the other flavors.  So far I have tried Cheddar Jack Bacon, Mesquite BBQ  and Italian Parmesan.  All of them were delicious.  Whatever your cooking Fish, Pork, chicken or Burgers they add a little kick to any recipe!
“I am a member of the Collective Bias®  Social Fabric® Community.  This shop has been compensated as part of a social shopper insights study for Collective Bias®  and Kraft Foods #FreshTake #cbias #SocialFabric” “all opinions are my own”

How to cover a pillow with a Dishtowel DIY

April 8, 2013 By: Freetimefrolics

Diy Pillow from a dishcloth www.freetimefrolics.com

I love finding  simple everyday things and turning them into something amazing.   Today I am going to share how to make a pillow cover with a Dishtowel.  This project was super easy ,cheap  inexpensive and makes an adorable throw pillow for a bed or chair. Making the pillow took me about 30 minutes, with minimal sewing. Not to mention it cost me less than $5.

Let’s get started.  First I found this dishtowel at TJ Maxx for $4.  I fell on love with the little appliqued birds and ruffle.  I knew immediately this little beauty was going to be a pillow for my daughters bed. The colors match her room perfect. My towel measured 20×30.

Next I picked out 3 buttons and 2 1/2 yards of ribbon to match.  I had a pillow for from a previous couch pillow I didn’t need anymore.  If you are looking for a pillow form, Home Fabrics and Rugs is a great place to get them.

Next I wrapped my dishtowel around my pillow form to get a general idea of how far the dishtowel would wrap. Mine wrapped around once with a a 5 inch overlap.  With that in mind, I folded the bottom edge of my dishtowel about 8 inches. I pinned the edges into place.

Next cut you ribbon into 8 equal pieces.  Burn the edges with a match.  This will keep the ends from unraveling.  Pin your ribbon into position. I pinned mine at the top of the folded edge and 3 1/2 inches from the bottom folded edge, in between the 2 pieces of fabric..

Stitch into place. Making a pocket for the pillow.
Place your pillow in the sewn pocket.  I did this to check for placement of the other ribbons. My ribbons were placed 3 and 7  inches from the top of the ruffle. Just make sure they sit directly even with each other. Stitch them into place.
For the last step I placed my buttons.  I measured for center and pinned.  For the other buttons I measured from the middle to each end and found that center and pinned on both sides.  This is where I made my button holes.

Hand stitch your buttons on and you are all done!! Now you have an adorable decorative throw pillow for a bed or chair for spring or a little girls bedroom.  My little girl loves her new decorative pillow on her bed.  I need to keep my eyes open for a few more just like them.

Mom’s Away Free printable for Dad’s & Caregivers

April 5, 2013 By: Freetimefrolics

Caregiver information printable www.freetimefrolics.com
Dad and Caregivers instructions for when Mom is away printable www.freetimefrolics.com
 Ever leave your kids with Dad or a Caregiver? Remember the old adage “When Mom’s away the mice will play??”  Well my little mice will play and maybe starve a little if I don’t leave some guidance behind. Coming up super quick my husband will be home with all 4 kids by… his… self. My Husband tries but he is no mom.  Staying home with 4 kids, being on call 24/7, cooking, cleaning and being mom for a long weekend is not really his wheelhouse.  That is my department for good reason.  But every once in a blue moon I get a girls weekend.  Don’t we all deserve a weekend with just the girls??  Well my weekend is coming up quick.  For Christmas this year I received a ticket to Snap! a blogging conference. And with this fabulous gift my husband is taking 2 days off work to allow me to go. Now let me emphasize how BIG of a deal this is.  My husband does not take work of for me to go have fun. This is Ginormous.  That is why him taking 2 days off was my only Christmas present.  My ticket was a combined effort on my part.
So with that being said, I want to make sure my kiddos are taken care of, as though I was right there. And everything will go smoothly for him.  So maybe in the future I can attend other conferences (ahem…Breathing Spaces) and Girls Weekends. So I came up with a quick free printable for my husband.  Just a little something to help him through his day. And to make sure my kids get to school, take naps, get medicine and go to sports on time. These are great to for babysitters or caregivers.  Just fill them out and leave with your kiddos and the person in charge.
 
I made 4 different colors. Spots for your schedule,  meal ideas or instructions and a spot for the special instructions like medicine,  special toys, cups or play date friends.   Print them off and fill them out.  Dad or your caregiver will love a little extra help!
These can also be helpful for babysitters, caregivers, grandparents or siblings that are taking care of your kids!
Please follow the Free Time Frolics Printable’s rules below. Thanks!

Caregivers Printable

Dad and Caregivers instructions for when Mom is away printable green www.freetimefrolics.comDad and Caregivers instructions for when Mom is away printable blue www.freetimefrolics.com

Green Emergency                                           Navy Emergency

Dad and Caregivers instructions for when Mom is away printable purple www.freetimefrolics.comDad and Caregivers instructions for when Mom is away printable yellow www.freetimefrolics.com

 Purple Emergency                                           Yellow Emergency

Dad and Caregivers instructions for when Mom is away printable orange www.freetimefrolics.comDad and Caregivers instructions for when Mom is away printable turquoise www.freetimefrolics.com

Orange Printable                                               Blue Printable

                                     Green Printable                                            Red Printable
PLEASE follow the following rules for Free Time Frolics printables:
  • I would love for you to become a follower of Free Time Frolics via Rss, Twitter or Facebook. More Free Printable’s are coming. You don’t want to miss out.
  • Free Time Frolics printable’s are for PERSONAL USE only. You may not re-sell, re-distribute, or claim them as your own.
  • If posting on the internet, you MUST post a link back to the original post or page.
  •  Freebie printable’s are offered “as is” unless otherwise noted.
  • Pin, share, use in your home or as a gift.  Enjoy!

Easy Color Block Tees DIY

April 3, 2013 By: Freetimefrolics

DiY color block tees for kids www.freetimefrolics.com


Have you seen the new styles in stores lately? I feel like I am in a flashback.  My 12 year old self on Christmas day wearing my color blocked shirt and acid washed hot pink jeans.  I was so cute.  As I shop for my daughter I see tons of clothing styles and colors I wore back in the day.  I keep seeing color blocking  and Neon everywhere.  Instead of buying all those expensive shirts I decided to make my own.  You can make yourself  2 shirts for under $10.  Here is how you do it.

Supplies: 2 or 3 T shirts Mix and match them how you want.
matching thread
Start with 2 t shirts.  I got mine at Walmart. Only $3.50 each.
 .

Line up your 2 shirts and cut them just below the sleeves.

Take the top of one shirt and the bottom of the other. Match up the cut edges with right sides together. Stitch together using a long stitch. I also used my serger to seal the seam.

Turn your shirt right sides out. Press your seam to one side. Stitch the seam using a medium to long stitch.
Pair it with your favorite pants and you are ready to go.


I decided to make a boy version and I love it.  This little man loved it too!

Sally Hansen GNO Nail Party

April 1, 2013 By: Freetimefrolics

“I am a member of the Collective Bias®  Social Fabric® Community.  This content has been compensated as part of a social shopper insights study for Collective Bias® . and COTY #cbias #SocialFabric “all opinions are my own”)

We we have been Spring Breaking here in Idaho.  It is still cold and wet here. Not a very fun spring break.   So this year I threw together a fun Mother Daughter Nail party day.  All the moms in the neighborhood brought there little girls over for for yummy treats and a fun girl time.  Sally Hansen knows how to enjoy a little girl time with wonderful products we all love. I heart nail art!

With the help of my good friends over Walgreens.  We got hooked up.

One of my favorite Sally Hansen products

Sally Hansen
My little Miss even got excited to pick out her favorite polish.  Glitter of course!
I had a wonderful Walgreens Associate that helped me out.  She totally hooked me up.  Here is the tip she gave me.  No matter what your buying in the cosmetics aisle be sure to ask the the cosmetics counter associate for coupons. They always have them for cosmetics. I purchased a lot of Sally Hansen products.  She saved me over $50 with coupons.  It was awesome!!! 
Sally Hansen offers tons of polish choices ranging from $2 to $15 a bottle.  
And don’t forget your Balance Rewards Card for even more savings!
Walgreens Balance Rewards
I started my party with a little at home spa treatment. Topped of with Sally Hansen Hand cream.  I loved the feel of this lotion .  My hands were soft for days!
Spa treatment
And Food! Velata, Veggies and Red Velvet cupcakes. Yum!
The girls has a blast picking out nail polish and painting there nails and there goodie bags.

Mom’s needed goodie bags too!
#iheartmynailart
I think our favorite products were The Salon Effects and the nail pens.  The girls and moms both loved them! We had such a fun time hanging out together and painting out nail.. The perfect Spring Break activity.
What will your favorites be???  Check out these great coupons to buy a few goodies of your own!
  • $1 off Sally Hansen Tweezers and Clippers
  • (3/31-4/27) Sally Hansen Extreme and Salon Effects 2/$5 w/ 1,000 points

Get connected with Wagreens and Sally Hansen
  • Sally Hansen Twitter
  • Walgreens Twitter
  • Sally Hansen FB

photo (16).JPG

Check out the entire post on my blog www.freetimefrolics.com

Royal Design Studio Stencil Review & Closet Makeover

March 29, 2013 By: Freetimefrolics

Royal Studio Design Stenciled Closet Redo www.freetimefrolics.com

closet makeover  royal design studio www.freetimefrolics.com

A closet Makeover is just what I need! These past few weeks have been crazy busy for me.  My kids have been out of school for spring break and that alone makes life crazy. I have had an itch to work on my closet.  It is crazy unorganized, dark and blah. It is huge and can fit 2 full sized mattresses end to end.  Let me also say “I am a blogger and I am unorganized”.  There I said it.  I may need an 8 step program or something.  I am a blogger and I am unorganized. My house is rarely tidy.  I have 4 kids and projects to do. Much more fun than walking around with a dish cloth in my hand all ..day…long. Bless those of you who do.  I am just not that type of person. I would like to be but not enough to give up what makes me happy!  So onto my unorganized closet… and a giveaway!

My closet was, well, out of control. The lights did not work.  Just cheap contactor lights. To many clothes. I have been hoarding them since I got pregnant  (3 years ago). You know wishing, hoping & praying that someday I would fit into them again. And a bunch of other things that don’t belong in a closet.  I just decided that it was time to purge the old stuff.  I was inspired by this E-book to get my fashion on. Here. And Royal Design Studio stencil to make my closet beautiful.
Here is a picture of my closet before. I had to use a flash due to a broken light fixture.
closet makeover before
See how crazy it was!  I really needed an intervention.
Royal Design Studio graciously sent me a Stencil to try out. They have tons of choices.  One for every style. You will get lost in all the patterns they have.  Here is the one I picked:
Casbah Trellis Moroccan Stencil from the Allover Moroccan Stencils Collection… I have been in love with this stencil for along time.  I love its simplicity.
I started with painting my wall with an all over mint color from Lowes.  I used Lowes white for the stenciled color.  I used one of there sample cans for the white. I had plenty to spare.  It was delivered lighting fast.  Only 4 days and it was knocking at my door.  The stencil was much larger than I thought.  Which I was grateful for.  I had a big wall to cover!  It came rolled up in a large box ready to use.   The instruction sheet included was very helpful to me. It included tricks and information on using there stencils. I also checked out there  HowTo Stencil on there website.   The stencil was made of thick flexible plastic and was very light weight.  Definitely a quality product.  Made to be reused.

royal design studio stencil

I started along the top of wall and worked my way down and across. Matching up the edges.  I used painters tape to hang my stencil.  I wish I would have gotten the spray adhesive to hold my stencil on the wall.  It still turned out great but having the adhesive would have been nice. Isn’t this stencil beautiful.  This picture, taken from my phone,  it’s a little grainy. (Sorry)  I used a small rolling foam brush to roll on the stencil. Some places are lighter than others.  I love it that way.  It gives it a weathered look.  It is very subtle on the wall but packs a punch. Over all it was simple to use.  After each section I used a wet rag to wipe the back of the stencil for any residual paint. My stencil is still in great condition and ready to use again. Maybe another project in the future???
So here is my finished closet.  I am in love with the stencil.  At first you almost think its wallpaper.  Until you are up close.  I decided to go with an accessory wall. I had 2 matching frames made.  One for a mirror and one for a peg board to hold my necklaces. I also used a bathroom towel rod for my scarves and 2 cabinet knobs for hanging purses.
closet make over split
Isn’t it amazing?!  I cleaned out 3 garbage bags worth of clothing.  Got rid of the things that just don’t belong.  I got a new light fixture at Lowes.  Along with some wicked amazing daylight light bulbs
closet makeover 2
closet makeover 3
For my bins I got them at Wal-Mart for $5 each.  I used my Silhouette to label the bins according to what  am keeping in them.  Just in case my husband decides to do laundry.  He will know where everything goes.
closet makeover 4

closet mirror
necklace storage
I love My closet makeover so much I just want to sit on the floor of my closet and listen to music as I enjoy the beauty.  Here is my view from the floor!
closet makeover 5

Tyson Family Meal Night {Cheese Steak Crescents}

March 27, 2013 By: Freetimefrolics


Having dinner around the table is important to our family. We eat dinner together at least 5 nights a week. But some nights I am just not in the mood to make anything. I try really hard to keep a menu and plan ahead, but some nights I just don’t have it in me. So I checked out Tyson’s refrigerated meal products and recipes online. There are so many to choose from. After searching for a bit I came up with this simple and delicious recipe. It came together in minutes and my family loved it! Cheese Steak Crescent Rolls!

Here is what I bought. The Tyson Grilled and ready products are in the refrigerated section, near the meats.


Crescent Roll Cheese Steaks
1 Bag Tyson Refrigerated Grilled & Ready Steak Strips
1/4 C. Diced bell pepper
1/4 C. diced Onion
8 sliced Provolone Cheese
1 Tube refrigerated Large Crescent Rolls


Place the onions and peppers in fry pan on medium heat. Stir until soft. Add the Steak. Stir until meat is warm. Open Rolls. Cut cheese into smaller pieces. Place cheese on crescent roll. Add 1/4 cup of meat mixture onto the roll. Roll crescent up and place on baking sheet. Bake at 350* for 12 minutes.


For more recipes using Tyson Refrigerated Meats check out these great links!

  • Website: www.tyson.com
  • Twitter: @TysonFoods
  • Facebook: http://www.facebook.com/GrilledAndReady

“I am a member of the Collective Bias®  Social Fabric® Community.  This shop has been compensated as part of a social shopper insights study for Collective Bias®  and Tyson®. #cbias #SocialFabric #MealsTogether” All opinions are my own.

Check out the entire post on my blog www.freetimefrolics.com

Guest posting

March 25, 2013 By: Freetimefrolics

Today I am guest posting over at Whatever Dee Dee wants.  Head over and check out my color block Tees for summer!

5 Easter Family Traditions for you Family

March 21, 2013 By: Freetimefrolics

Free Time Frolics: 5 Easter Family Traditions for you Family
Do you have any family traditions for Easter??  Our family has a few but nothing set or exciting.  So I decided it was time to make some traditions.  I I have come up with 5 Easter Traditions that any family can adopt as there own.  They are easy to put together and can be inexpensive.

1. Easter Egg Derby
Start with an raw egg for every person. Decorate them how ever you like. Have everyone pick a number.
Set up as a bracket.  Using a large piece of cardboard, hold it in the shape of a half pipe. (If you have mad  carpentry skills you can make a half pip for the occasion)  Have numbers 1 & 2 hold there eggs in the center of the cardboard.  Count to three and release the eggs.  Which ever egg comes out intact moves to the next bracket. Use the Bracket to keep track.  The last egg standing is the winner.

2. Adult Easter Egg Hunt
I have a few friends that enjoy an Adult Easter Egg Hunt. I would love my parents to do this.  The concept is a basic Easter Egg hunt but instead of candy or toys the eggs are filled with money or gift cards.  There is one mega prize like a $50 bill and the others have smaller bills. Some day I hope to be able to do this for my children and their spouses a few years from now.

3. Easter basket treasure hunt
 In our house it has been a tradition for the Easter Bunny to hide our Easter Baskets.  That Darn Bunny has hid them in the Dishwasher, Dryer, Under sinks or in a food storage bucket.  But this year I am requesting the Easter Bunny send my kids on a treasure Hunt.  The basket will be hidden. An egg is left on the side of their bed.  That egg should have a clue to finding the basket but leading to the next clue.  Leave as many clues as you like. Here are some clue tags you can print and use.


4. Neighborhood Bunny Hop
Similar to the neighborhood ghost at Halloween.  Make a treat and bring your neighbors out to meet Spring.

5. Secret Easter Bunny + Printable

Think Secret Santa but less elaborate.  Just a little something to help out a family in need or a sweet surprise for a family you love.  Check out the link for your free printable.

Neighborhood Bunny Hop + Printable

March 18, 2013 By: Freetimefrolics

neighborhood bunnyhop for easter www.freetimefrolics.com

Today’s original post was an epic fail.  Ever have those??  Well today’s was a big one.  So instead I am re sharing my Neighborhood Bunny Hop.  I love holiday ideas that can involve the whole family. With spring just around the corner, it’s time to get out and see your neighbors again   Here in Idaho its been a long hard winter.  I think we have gone a little crazy cooped up in the house. If your kids are like mine they will love to make and deliver a secret treat to a neighbor. Not to mention this is a fun family activity. I love seeing how many homes participate in this fun neighborhood pass around. This one is super easy, just make a copy of the printable below. Pair with a treat and deliver.
neighborhood bunnyhop for easter www.freetimefrolics.com

Bunny Hop Printable
For more family holiday ideas click {Here}
  • « Previous Page
  • 1
  • …
  • 27
  • 28
  • 29
  • 30
  • 31
  • …
  • 49
  • Next Page »
  • Facebook
  • Google+
  • Instagram
  • LinkedIn
  • Pinterest
  • StumbleUpon
  • Twitter
  • YouTube

Shop my Moji LIfe

Shop my Plexus

SEARCH MY BLOG

INSTAGRAM @Freetimefrolics

MY RECENT PINS

Visit Adrienne {FreeTimeFrolics.com} Blogger's profile on Pinterest.

Categories

Archives

FOLLOW ME HERE

  • Facebook
  • Google+
  • Instagram
  • LinkedIn
  • Pinterest
  • StumbleUpon
  • Twitter
  • YouTube

Copyright © 2026 · Modern Blogger Pro Theme By, Pretty Darn Cute Design