Free Time Frolics

  • PRINTABLES
  • EAT
  • House
  • Make
  • Sewing
  • LDS
  • Home
  • About
  • Pr/Advertise
  • Contact
  • Shop
  • Store

Vintage {Button} Bracelet

May 22, 2012 By: Freetimefrolics

Vintage Button Bracelet Tutorial www.freetimefrolic.com
My friend Malinda is sharing an amazing Button Bracelet today.   She is a crafty Momma of 5 girls.  She loves to craft and try new things.  From the beginning we were a match. She is great to bounce ideas off of and make girlie things with. Enjoy this quick and easy tutorial.  She made this beautiful vintage button bracelet in under 30 minutes and for less than $10.
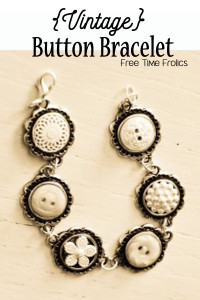
So I have gone a little vintage button crazy. I came across a jewelry line that uses antique and vintage buttons. They are so cool looking! So I thought I would make a few pieces (ok so a little more than a few…) Hey, its a creative outlet right? Anyway one of may favorite and easiest pieces to make was this button bracelet. This one is made out of vintage looking plastic buttons that I picked up at a craft store. You can do this with just about any kind of button as long as it can fit on the finding that you use.
Vintage Button Bracelet tutorial www.freetimefrolics.com

Button Bracelet supplies

Some cute charms that have holes on two ends
buttons
jewelry glue
jump rings or some kind of connector links
a lobster clasp
and my pliers and crimpers
I used 6 charms and made the bracelet a little big for my wrist, so you probably can get away with 5 and add a bead or something on the end to lengthen it a bit.

First decide what buttons to use, make sure they will fit in the charm or on top. If some of them have shanks on them use some wire cutters to cut them off. The plastic ones I used make it easy to get them off.

Now just glue to buttons on.

Wait a few hours or a day to let the glue dry, then using the jump rings or some kind of link to connect put them together.

jewelry clasps www.freetimefrolics.com

Now add your lobster claps and some kind of ring for it connect to. Ok your done! Now go admire your work and enjoy the compliments!

vintage button bracelet www.freetimefrolics.com
Thank youso much Malinda.  I wish this bracelet was for me but nope.

{Pin}Tastic Friday – Monterey Chicken

May 18, 2012 By: Freetimefrolics

Its {Pin}tastic Friday.  I love Fridays.  The weekend is here.  I get to spend time with my family and sometimes get a little time to myself, in my craft room.  I found this pin through a friend.  And I am sure glad I did.  It is delicious.  Every person in my family loves it.  And that is saying something.  All of my kids are picky.  There are very few things they agree on.  This is one of them.  The first time I made it I served it over a bed of spinach.  Talk about yummy.  It was like a healthy salad.  The second time I made garlic mashed potatoes.  The kids prefered the potatoes.  Who wouldn’t.  Either way it is a {Pin}tastic dinner especially for summer.  I hope your family enjoys it as much as mine.
The original source for this recipe is over at All Things Simple.  Lots of goodies over there check them out sometime. 
And noe, what you have been waiting for…… Monterey Chicken!

MONTEREY CHICKEN4 boneless, skinless chicken breasts
1/4 c. bar-b-que sauce ( I use Bull’s Eye)
1/4 c. real bacon bits
1 c. colby and jack cheese, shredded
1 14 oz. can Rotel tomatoes, drained (canned with green chilies added)
sliced green onions
pepper

Preheat oven to 400 degrees. Pound out chicken breasts to flatten. Season with pepper. Grill chicken until no long pink (we used our George Foreman grill) and place on baking sheet covered with foil. Top each chicken breast with one tablespoon bar-b-que sauce, 1/4 c. cheese, 1/4 c. tomatoes, green onions and one tablespoon of bacon bits. Place in oven and bake until cheese is melted (about 5 minutes).
This is Kim’s reciped from her site.  I used a different BBQ sauce.  All the rest is the same. 

Check out the entire post on my blog www.freetimefrolics.com

Covered Corkboards

May 16, 2012 By: Freetimefrolics

Next week is Free Time Frolics Birthday.  Make sure come back and check out some great guest blogger and a fantastic giveaway!

On to this week.
Teacher Appreciation was last week and I am a little behind.  I have had this one in my cue for a while needing 1 picture.  I finally got it done.  So here is a quick easy teacher gift you can do with afew supplies from you home and a couple of dollar store items.
Supplies
Piece of Cork
Frame
Spray paint (optional)
Spray Adhesive
Tacks
Buttons to Cover
Fat quarter or enough fabric to cover your cork
E6000 Glue
Glue Gun w/ Glue
Frame backing or foam core
2 or 3 fabric scraps (2×2 squares) for tacks
Start by spray painting your frame is you are changing its color.  This can be drying while you make the inside.

Start by Cutting your cork to the inside size of your frame.  Take fabric and cut it 1 inch larger around cork.  Iron your fabric nice and flat to get out wrinkles.
Spray adhesive onto wrong side of fabric.  Layer cork and frame backing onto fabric. Flip over to ensure the fabric is nice and flat.

Glue fabric around foam core and cork. On Wrong side. 

Your inside board is done. Now for the tacks

 Use the buttons covered found in the sewing accessories in the fabric department.  I chose the smaller size but you can use whatever you want.  Follow the instructions on the back of the package to cover your buttons.

Once you have made your buttons you need to cut off the button shanks to give you a flat surface to glue the tacks on. 

Glue your tacks on the backs of your buttons with E6000 Glue.  They will need to dry over night. 
Next
Place your wrapped cork into the frame.

Add your tacks and your done.

This is a quick project you can make in an hour or so and easy for the kids to help.  Wrap it up and your ready to go. Use it for a teacher gift, kids bedroom, family command center or anywear you need to cover some space.

Enjoy!

52 Mantelsfive days five ways  feature friday free for all

Check out the entire post on my blog www.freetimefrolics.com

Washi Tape Frame

May 14, 2012 By: Freetimefrolics

While searching the thrift store I cam across this terrible looking frame that was screaming for a make over.

Pretty Ugly huh?  I took the art work out and went to work.
A fresh coat of white paint.   It took about 4 coats. Then I added a little Washi love to the inside of the frame.  The washi tape was the perfect width to match the inside frame.

 
I was initially going to use this frame in my craft room until I remembered I had this great printable I made last summer.  I printed it out and the colors were perfect for each other.  So now it is my new frame for my summer mantel. Here is the link to the Summertime printable.
    
Linking up too:

Tip Junkie handmade projects52 Mantelsfive days five ways  feature friday free for all

Check out the entire post on my blog www.freetimefrolics.com

{Pin}tastic Friday – Homemade Pizza Dough

May 11, 2012 By: Freetimefrolics

I have decided to start a new post every Friday.  {Pin}tastic Friday.  I am going to share all of the things I pin and try out.  There are som many great things on Pintrest. We all do it.  It is a crazy addiction I have.  I check out Pintrest most every day.  I love to try new things.  Especially recipes.  Who needs a cookbook when you have pintrest.

So each Friday I am going to share my recipes that are FTF (Free Time Frolics) approved!

For my first {Pin}tastic pin, head on over to Six Sister’s Stuff.  It is for their Homemade Pizza dough. This is truly the best Dough EVER. Better than store bought, box mix are any other recipe you may have.  My kids don’t even want to buy pizza anymore.  They want home made.   Its quick and easy to make. Each kid gets a section of Pizza for there toppings and everyone is happy.  I even used it for breadsticks.  They were a hit. Sorry Pizza Hut, Little Ceasars and Dominos.  There is a new recipe in town.  I would totally recommend this recipe. It is full proof!

Want to follow me on Pintrest.  Click on my “P” Button at the top and see what I am pinning in my Free Time.
Check out the entire post on my blog www.freetimefrolics.com

Teacher Printable

May 8, 2012 By: Freetimefrolics

Teachers are super important.  Without them where would our children be? (Moms too!)  They probably spend more time with our kids than we, as parents do.  I made this printable to remind us of what a teacher is.  They are all theses things and  more.  Thank you to all the teachers out there. Your patients and creativity in teaching our children is a appreciated.

O put it on a clipboard.
Here is what my teachers are getting this week!
Here is a fun printable for your teacher.  Frame it up, put it on a clipboard.  Whatever you like.
 Each prints off as an 8×10. Right click each image and save to your computer.

PLEASE follow the following rules for Free Time Frolics printables:

  • I would love for you to become a follower of Free Time Frolics. More Free Printables are comeing. You don’t want to miss out.
  • Free Time Frolics printables are for PERSONAL USE only. You may not re-sell, re-distribute, or claim them as your own.
  • If posting on the internet, you MUST post a link back to the original post or this page.
  • Freebie printables are offered “as is” unless otherwise noted.
  • Pin, share, use in your home or as a gift. Enjoy.

Thanks for visiting!

Basket Purse

May 7, 2012 By: Freetimefrolics

I found this little basket bag at target in the dollar section.  My target sold out of them but thy just got some.  So hurry over and grab one.  My little girl is a girly girl who love to play with the boys.  So I gave her a girly bag for her dolls and cars.

Here is what you need:
Basket bag
5 x 45 inches of fabric
Tim Tex stabilizer about 10 inches
I started with the basket and 5 inches of fabric. The fabric will measure 5 x 45 inches. Fold in half and iron. Next I stitched a basting stitch along the raw edges.
Pull the bottom thread to lightly gather the fabric.
Cut your tim tex into a 5 inch circle. Start with your glue gun from the outside edge of your Tim Tex. Working around until you have reached center.
Once you reach center fold your raw edge and tuck it into your flower. Add a button. I just glued mine in.
This is what it looks like from behind.  I used some hot glue to attache it to my bag.
Super simple.

It’s perfect size form my little miss.  She fills the bag and off to the park.

Linking up too:

DelectableHomeapinchofjoy.comTip Junkie handmade projectsfive days five ways  feature friday free for all;http://salttree.blogspot.com/

Check out the entire post on my blog www.freetimefrolics.com

DIY Knobby Necklace

May 2, 2012 By: Freetimefrolics

A few weeks ago I had the opportunity to guest post over at My Sisters Suitcase.  So here is the post I shared.  Remember the Knobby Necklace??  When I posted it I was in a hurry and didn’t have time to get up the tutorial on how I made it.  So now I am going to share.
To start you need to gather your supplies.
1 cabinet knob
chain (I used 2 different ones.  1 large, 1 small)
3-4 beads
wire
Bead caps- for 2 for each bead
Tools needed: wire cutters, round tipped wire pliers
Next watch this You Tube Video on how to Wrap beads.  She makes is look easy.  And very detailed.
Start with wrapping your beads.  You can wrap them directly onto your chain or wrap them and then open the links to your chain and connect them.  Don’t forget to add your bead caps.
Next your chain. I measured how long I want my necklace. Usually around 30 inches or so. I do my small chain about 24 inches and my large chain about 6 inches or so. Do whatever you like best. Link them together.
For my knob I used this pink one.  Which ever you choose it has to have a hole all the way through.  I found this knob on Mindy Maes Market.  I have also seen some at Hobby Lobby.
This particular one was dark on the top so I covered it in a little glitter glue and added a filigree flat.
I let it dry for an hour or so. Then wire it like you would any other bead and attach it to the chain.

Next your chain. I measured how long I want my necklace.  Usually around 30 inches or so.  I do my small chain about 24 inches and my large chain about 6 inches or so.  Do whatever you like best. Link them together.

Linking up too:

Visit thecsiproject.com

Check out the entire post on my blog www.freetimefrolics.com

Leibster Award & A Giveaway

April 19, 2012 By: Freetimefrolics

First order of business

Meredith from Haute to Sew picked my blog to receive the Liebster Award.  I am so honored.   I had not heard of the Liebster Award until then.  So here is a little background.

Liebster Award

 Liebster is German for ‘dearest’ or ‘beloved’– but it can also mean ‘favorite’. The Liebster award was created to give some attention to those blogs with less than 200 followers.

So when I found out that I won the Liebster Award from Meredith I was super excited. You should check out her blog.  Its super cute and filled with lots of tips and tricks and projects.  Defiantly in my blog reader.

In accepting the award, you are supposed to follow these rules:
1. Show your thanks to the blogger who gave you the award by linking back to them.
2. Reveal your five picks for the award and let them know.
3. Post the award on your blog.
4. Bask in the love from the most supportive people on the blogshare-other bloggers.
5. Finally and the best rule of all………have fun and spread the love!


And now here are my 5 faves that follow the guidelines for the award so you can check these lovelies out in no particular order:

1. Baking with Blondie
2. Tish-Delectable Home I picked her before she hit her 200 followers.  I am so glad she reached that milestone. Congrats!
3. Michelle- Jones Party of 5
4.  Those Crafty Sisters
5. Kendal1- Every Day Giggles

And to celebrate my Liebster award and reaching 100 followers I would love to do a giveaway.So here’s how it goes.

Washi Tape is all the rage so for this giveaway I am going to spread a little Washi Love.  1 lucky follower is going to win a Free Time Fun prize package.


It includes: * Washi Tape from my stash that  I would love to share with you. 
*Project starters to go with your Washi Tape.
*A few random lovelies from PYP. I am kind of a PYP hoarder.  I always buy a little extra so I am going to share the love. 
*And last but not least, your choice of $25 gift card.  You can choose from TJ Maxx, Joanns, Michaels or Target. 
Over $50.00 in prizes mailed right to your house. 

So there it is.  A little {Love} From Me.  Thanks for supporting me and my little blog.  I {Heart} you all.
 
Answer the questions and do what they ask.  The giveaway is open from April 19th- April 26th. Next week I will draw the winner.  Easy peasy! I hope you win the contest!

a Rafflecopter giveaway

Check out the entire post on my blog www.freetimefrolics.com

Guest Post at My Sister’s Suitcase

April 17, 2012 By: Freetimefrolics

Hey Ladies this one is for you.  It’s Girls Just Wanna have fun week over at My Sister’s Suitcase.  While they are away at SNAP! some of us gals are going to play in there blog.  Head on over for some fun post from Me and a few other fun gals! They are doing a fun giveaway at the end of the week.  My Knobby Necklace will be in the Girls Just Wanna have Fun Basket of Goodies.
Head over and check it out.
mysisterssuitcase.blogspot.com

Check out the entire post on my blog www.freetimefrolics.com
  • « Previous Page
  • 1
  • …
  • 40
  • 41
  • 42
  • 43
  • 44
  • …
  • 49
  • Next Page »
  • Facebook
  • Google+
  • Instagram
  • LinkedIn
  • Pinterest
  • StumbleUpon
  • Twitter
  • YouTube

Shop my Moji LIfe

Shop my Plexus

SEARCH MY BLOG

INSTAGRAM @Freetimefrolics

MY RECENT PINS

Visit Adrienne {FreeTimeFrolics.com} Blogger's profile on Pinterest.

Categories

Archives

FOLLOW ME HERE

  • Facebook
  • Google+
  • Instagram
  • LinkedIn
  • Pinterest
  • StumbleUpon
  • Twitter
  • YouTube

Copyright © 2026 · Modern Blogger Pro Theme By, Pretty Darn Cute Design